Info-Explorer FAQ
Getting Started with Info-Explorer for Sage 300
Sample cubes are provided for Sage 300 databases. They include standard queries relevant for Sage 300 users. When you open the sample cube, you will see data from the Sage 300 sample data to illustrate the dashboard, charts and analysis capabilities of Info-Explorer.
Step 1. Download sample cubes
Cubes are available for:
-
Sage 300 GL, AR, AP, PO, PJC, IC, OE/Sales Analysis
-
Sage 300 US & Canadian Payroll
-
Orchid Extender, RMA, Bin Tracking
-
Budget Analysis
-
Selected 3rd Party products
Getting Started with Info-Explorer for Spire
To start using Info-Explorer, you need a cube file. In most cases, you start with Orchid demo cubes.
Note: Available since May 2023 on the Info-Explorer website https://www.info-explorer.com/resources/cubes.
Step 1. Download sample cubes
Sample cubes are provided for Spire databases. They include standard queries relevant for Spire users. When you open the sample cubes, you will see data from the Spire sample data to illustrate the dashboard, charts and analysis capabilities of Info-Explorer.
You can create your own cubes and connect to the Spire databases using ODBC.
To create a formula fact, click on the Edit Fields Icon  on the button on the Home Tab > View Ribbon and
choose the type of fact being "formula".
on the button on the Home Tab > View Ribbon and
choose the type of fact being "formula".
-
Type in the field name
-
Type in the field caption
-
Choose the value as "formula"
-
Type in the formula, using existing Factname.Value
Example: BUDGETSALES.VALUE-BUDGETCOST.VALUE for a budget margin calculation.
If you have created a style in Info Explorer and you want to remove it for any reason, either it is not required, or you may have a wrong spelling), press Delete key on keyboard to delete the selected style from the cube.
For Traffic light reporting, create 3 Styles for TrafficLightGreen, TrafficLightOrange and TrafficLightRed and apply the new style to the required fact:

Set the rules for the field / fact:
-
If less than 50, apply TrafficLightRed style
-
If between 50 and 60, apply TrafficLightOrange style
-
If greater than 60, apply TrafficLightGreen style
There are three ways to filter a dimension
-
filter using a tick box (on/off)
-
filter using a prefilter on the underlying dimension values
-
filter using calculated fact values
The ![]() filter calculated fact values allows you
to build filters on columns by row data, or rows by column data.
filter calculated fact values allows you
to build filters on columns by row data, or rows by column data.
Click on the red calculated values filter and build the filter string as required.
When selected on a row dimension, you can filter all the rows based on
-
The grand total being compared to your condition
-
Every column compared to your condition
-
At least one column compared to your condition
-
A specific column compared to your condition
![]() Clicking Properties on the Home Ribbon will allow you to define
and change the existing properties of the cube.
Clicking Properties on the Home Ribbon will allow you to define
and change the existing properties of the cube.
Use the Options > Lock buttons to set passwords on selected functions in Info-Explorer.
If there is an error when refreshing the cube, the error message is displayed. In some cases, the error message may be truncated.
To see the full error, please try using CTRL-C when on the error message and CTRL-V to paste into Notepad or other editor.
You can amend the cube query to add / remove fields from database tables or calculated fields to the cube. There two methods:
Using Query Builder:
The "Query Builder" generates a diagrammatic representation of your SQL query, showing the things that provide your cube with Dimensions (things to analyse data by) and Facts (the data to analyse). E.g. the relevant tables with their associated joins, the selected fields, and any formatting and calculations applied to those fields.
Refer to Query Builder
Updating the cube Properties
You can also update the cube queries without using Query Builder.
For example, if you are converting an existing report with a query that you want to use in Info-Explorer or in cases where the query is too complex to represent diagrammatically in Query Builder.
In a sales analysis cube, you have a Net Sales fact and a customer dimension.
If you want to know how much each customer represents as the % of the total, you can do the following:
-
Create a view in the cube with Customer as a Row dimension
-
Add Net Sales as a fact to the view
-
Add a Field to the cube, select Value = Sum, Of Field = Net Sales and Display As = Percent of column
-
The new field now displays the % of the total column
Right click on any total value, and select Drilldown to view the underlying transactions and records that make up the total.
The level of details depends on how the cube query is designed.
Click the Control button and “C” at the same time will copy the contents of the data grid to the clipboard. You can then paste the details into another application if required for quick one-off analysis.
Spire ODBC Detailed steps
Step 1. Prerequisite to setup Spire ODBC
You need a 64-bit ODBC connection to the Spire database to use Info-Explorer. You can use an existing connection or create a new one.
In most cases, you need to add some lines to the Spire pg_hba file on the Spire server as follows:
File: "C:\ProgramData\Spire\PostgreSQL\14\pg_hba.conf"
The ODBC Credentials can be found in the spire.ini file in C:\ProgramData\Spire for spireapp
Note: Contact your Spire partner for assistance with setting up the ODBC connection.
Step 2. Install 64-bit PostgreSQL ODBC Driver
As Info-Explorer is a 64-bit application, you need to download and install the 64-bit ODBC driver on machines used to refresh the cube.
Refer to PostgreSQL site to download the ODBC driver. https://www.postgresql.org/ftp/odbc/versions/msi/
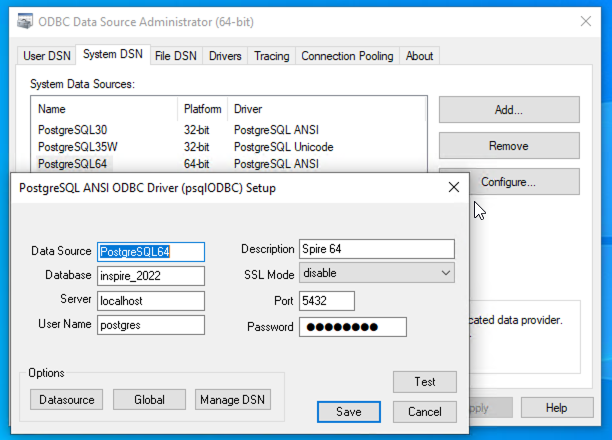
Step 3. Create an ODBC Connection to the PostgreSQL database
: This name will be used in Info-Explorer
: Enter the Database Name that you want to analyse with Info-Explorer
: Enter a database user that has rights to read the database.
Tip: You can use the credentials found in the spire.ini file in the c:\ProgramData\Spire folder on spireapp mentioned above or create a dedicated user with sufficient rights to the database.
Step 4. Update Connection Details in Info-Explorer
: ODBC
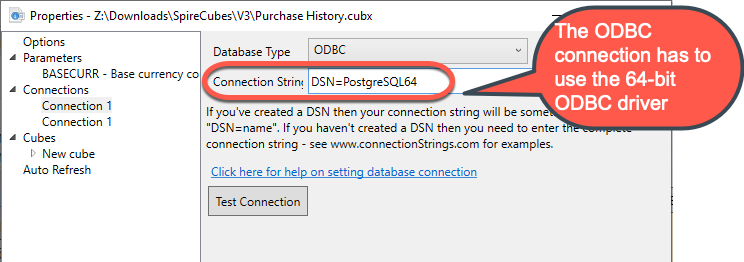
Option 1: Use ODBC Connection
: If you have setup an ODBC connection, enter DSN=ConnectionName in Info-Explorer > Properties > Connection
In the example below, the DSN is called PostgreSQL64
Option 2: Use full connection string
Alternatively, you can enter the full Connection String with the following details
DSN=PostgreSQL30;HOST=localhost;DB=inspire+2022;UID=user;
PWD=passwd;PORT=5432;

Step 5. Test the Connection
Use the Test Connection button to ensure the connection is successful.
Troubleshooting the connection
If you get an ODBC error 22P05, error: character with byte sequence in encoding UTF8 has no equivalent in encoding WIN1252, change the driver from "PostgreSQL ANSI(x64)" to "PostgreSQL Unicode(x64)", then restart Info-Explorer and check if it works ok.
Step 6. Save the cube
Save the Cube and Refresh the Data.
-
Manually in Info-Explorer : Refer to Refresh cube manually
-
Configure Auto-Refresh while using the cube: Refer to Auto Refresh Option.
-
Configure Refresh on Opening the cube - Go to the Home > Properties > Cubes > Select a cube.
-
Refresh automatically without using the application: Refresh Cube with Command Line
-
If using Sage 300, you can use Process Scheduler Level 1 to refresh and email the cubes to selected users. Refer to Process Scheduler Help for details:
Process Scheduler help - Refresh Info-Explorer Cube
Field: Select the Aggregation type, such as SUM, AVERAGE, MINIMUM
Details of Aggregation Types:
-
Formula to define your own calculation in the Formula box (for example Margin % shown below
-
Sum - to total the fact defined in the "Of Field"
-
Number of records in "Of Field"
-
Minimum - to display the minimum of values in "Of Field"
-
Maximum - to display the maximum of values in "Of Field"
-
Average - to display the average of values in "Of Field"
-
Ascending Rank - to display the relative rank of values in "Of Field", lowest is 1
-
Descending Rank - to display the relative rank of values in "Of Field", highest is 1
Dimensions are the axes used to organise and categorise the data.
Facts are the data points you want to analyze. They are numeric and are aggregated using functions like SUM, AVERAGE, COUNT, etc.
Refer to Create / Amend /Delete a fact for details.
When Info-Explorer builds a cube from a SQL query, it assumes String columns in the queries will become Dimensions and Numeric columns in the queries will become Facts.
Dimensions are displayed in black letters in the Available Fields Area.
Facts are displayed in blue letters.
Using Info-Explorer Lite with Demo Cubes:
With Info-Explorer Lite, you can only open and refresh Orchid demo cubes available from Info-Explorer menu > Download sample cubes or the Orchid website.
Note: Some cubes in the Info-Explorer Sample cubes are not available with Info-Explorer Lite as they require features not available in Info-Explorer Lite.
Other Limitations of Info-Explorer Lite
-
You cannot "Create Cube"
-
You can only view a single query cube at one time
-
Result sets not being able to be exported to Excel, CSV or HTML.
-
The cube SQL query cannot be amended
You can create multiple dashboards in a cube to display separate views and charts in a single page.
If the cube has multiple queries, you can add views relating to the different queries in a single dashboard.
To create a new dashboard :
-
Click Create dashboard icon
 on the Home Tab > New Ribbon or
 -
Right Hand Mouse Button on a View or chart name and Select New dashboard
Info-Explorer update (July 2024)
-
Fixes an issue with Drill-through to Sage 300 screens.
-
Note: You need to download the latest update from the Info-Explorer website. Due to the changes in the security settings on our website, the auto-update feature doesn't work with older Info-Explorer updates.
Info-Explorer update (May 2023)
-
Info-Explorer is now a 64-bit application. This increases the maximum size possible for a cube.
-
Default installation path is in the Program Files folder and not Program Files (x86) folder as previously.
-
Online help now accessible from the application.
-
Sundry branding updates.
-
Download sample files and Activation Code requests menus refer to Info-Explorer.com website
-
Drill-through to Sage 300 screens now support Complex Passwords in Security options.