Getting Started with Info-Explorer for Spire
To start using Info-Explorer, you need a cube file. In most cases, you start with Orchid demo cubes.
Note: Available since May 2023 on the Info-Explorer website https://www.info-explorer.com/resources/cubes.
Step 1. Download sample cubes
Sample cubes are provided for Spire databases. They include standard queries relevant for Spire users. When you open the sample cubes, you will see data from the Spire sample data to illustrate the dashboard, charts and analysis capabilities of Info-Explorer.
You can create your own cubes and connect to the Spire databases using ODBC.
Cubes are available for:
-
Spire GL, AR, AP, Purchase Orders, Inventory, Order/Sales Analysis
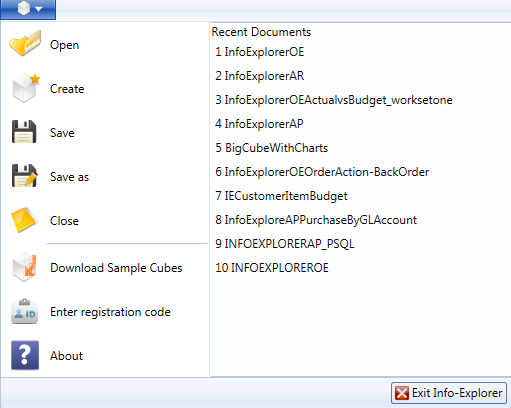
From Info-Explorer, Click File > Download Sample Cubes
Step 2. Update connection details
You update the connection details to connect the sample cubes to your data.
Select Properties on the Home Ribbon:
-
Click on the appropriate connection
-
Amend the connection details.
-
The details to provide depend on the database type.
Connection Details when Using Spire
Step 1. Prerequisite to setup Spire ODBC
You need a 64-bit ODBC connection to the Spire database to use Info-Explorer. You can use an existing connection or create a new one.
In most cases, you need to add some lines to the Spire pg_hba file on the Spire server as follows:
File: "C:\ProgramData\Spire\PostgreSQL\14\pg_hba.conf"
The ODBC Credentials can be found in the spire.ini file in C:\ProgramData\Spire for spireapp
Note: Contact your Spire partner for assistance with setting up the ODBC connection.
Step 2. Install 64-bit PostgreSQL ODBC Driver
As Info-Explorer is a 64-bit application, you need to download and install the 64-bit ODBC driver on machines used to refresh the cube.
Refer to PostgreSQL site to download the ODBC driver. https://www.postgresql.org/ftp/odbc/versions/msi/
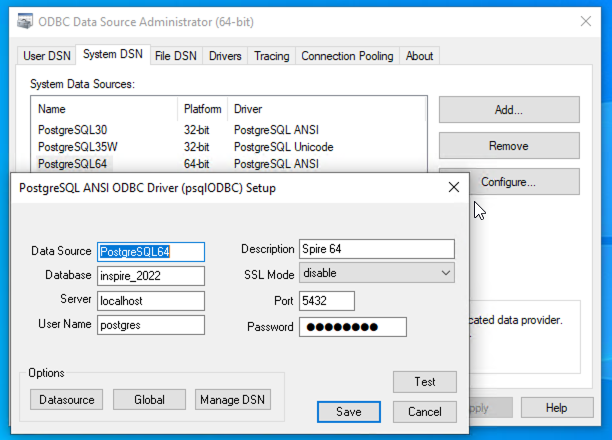
Step 3. Create an ODBC Connection to the PostgreSQL database
: This name will be used in Info-Explorer
: Enter the Database Name that you want to analyse with Info-Explorer
: Enter a database user that has rights to read the database.
Tip: You can use the credentials found in the spire.ini file in the c:\ProgramData\Spire folder on spireapp mentioned above or create a dedicated user with sufficient rights to the database.

Step 4. Update Connection Details in Info-Explorer
: ODBC
Option 1: Use ODBC Connection
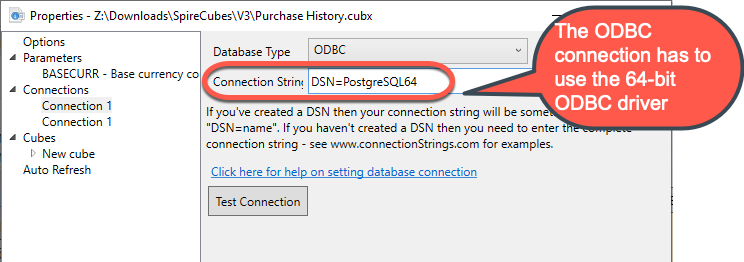
: If you have setup an ODBC connection, enter DSN=ConnectionName in Info-Explorer > Properties > Connection
In the example below, the DSN is called PostgreSQL64

Option 2: Use full connection string
Alternatively, you can enter the full Connection String with the following details
DSN=PostgreSQL30;HOST=localhost;DB=inspire+2022;UID=user;
PWD=passwd;PORT=5432;

Step 5. Test the Connection
Use the Test Connection button to ensure the connection is successful.
Troubleshooting the connection
If you get an ODBC error 22P05, error: character with byte sequence in encoding UTF8 has no equivalent in encoding WIN1252, change the driver from "PostgreSQL ANSI(x64)" to "PostgreSQL Unicode(x64)", then restart Info-Explorer and check if it works ok.
Step 6. Save the cube
Save the Cube and Refresh the Data.
Refer to Connect to a database for details.
Save the cube using File > Save as .  and choose where to save the cube.
Step 3. Refresh the data
![]() to refresh the cube data.
to refresh the cube data.
Refer to Refresh cube manually
Step 4. Start Analysing Your data
You can Change what you view in Info-Explorer by changing the dimensions, creating new views, charts and dashboards.
You can view details using Drill-down to underlying records: Drill down to view details.


