A/P Payment Batch Approval
Overview
A company wants only certain users to approve A/P Payment Batches. They configure workflow using Orchid Extender to control who can set A/P Payment Batches to "ready to post".
This A/P Payment batch workflow template is designed to be started automatically when the A/P Payment batch status is updated in Sage 300.
When a user sets the batch to Ready to post, the workflow will reset the Batch status to Check Creation in Progress (8) until the request is approved. This ensures the batches cannot be modified while the workflow is in progress.
When the request is approved, the batch status is set to Ready to Post and the batch is posted automatically.
When the batch is rejected, the status is reset to Open.
The workflow updates the batch description to include Submitted or Approved to inform users.
Sample files
You can import the"A/P Payment Batch Approval sample module. It includes a workflow template and required message templates. The workflow template is attached to the AP Payment batch status field.
AP Payment Batch Approval Module

Note: The module is supplied on an as is basis for training and demonstration purposes only and is not supported by Orchid Systems. If this code is deployed in a live production environment it is the responsibility of the End User to ensure that it is operating as required.
EXTENDER SETUP KEY STEPS
To start using the AP Payment approval module, you need to follow the steps below:
Step 1. Configure SMTP Email settings in Extender Options
This is required for the workflow to send emails to users, that an approval is required and when a batch is approved or rejected.
Refer to Extender Email Tab
Step 2. Configure Workflow Users
All Sage 300 users who need to approve batches on the workflow console need to be set as Workflow Users. Extender License and Workflow Users
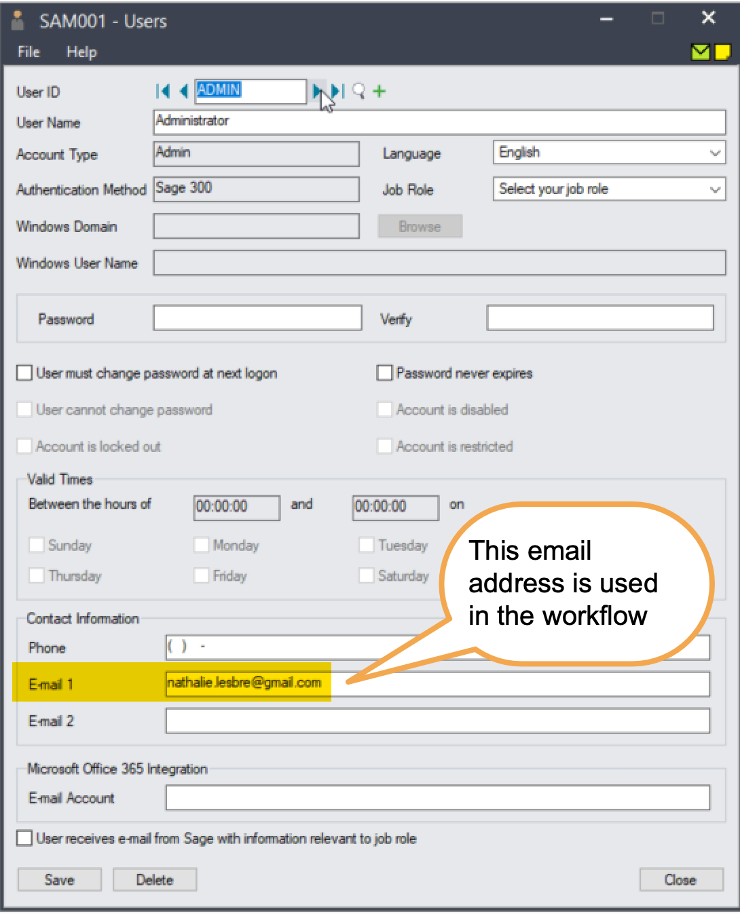
Check Sage 300 users email addresses
Step 3. Create Workflow User Group
Create a workflow user group called APPAYMAPPROVER. You can add the required Sage 300 users to that group. Refer to Workflow User Groups for details.
If you don't create a workflow user group, you can select a Sage 300 user as the approver. See Step 6 below.
Step 4. Add Workflow colours
The AP Payment batch approval uses 2 colours: URGENT if there are any errors, and ACCOUNTS for regular workflow records on the Console.
You can choose the colour you want for the console, as long as you create Workflow Colours with the same names. (Workflow Colours).
Step 5. Import the AP Payment Batch Approval.vi file
It will create a workflow template, message templates and link the workflow to the AP Payment batch view.
-
Create a "Workflow Template" in Extender Setup > Workflow Templates
-
Add message templates

-
To amend the message templates, refer to Message Templates
-
Attach the Workflow template to the AP0030 > BATCHSTAT Field
Step 6. Configure the AP Payment approval module
In Extender Setup > View Events, Scripts and Workflow,
-
Select the AP0030 view.
-
On the Workflow Tab, set the required values for your company
-
In Parameter 1, enter the Sage 300 user or Workflow User Group (e.g. APPAYMAPPROVER created in Step 3) who can approve.
-
Set the path where to save the Batch listing Report in Parameter 2.

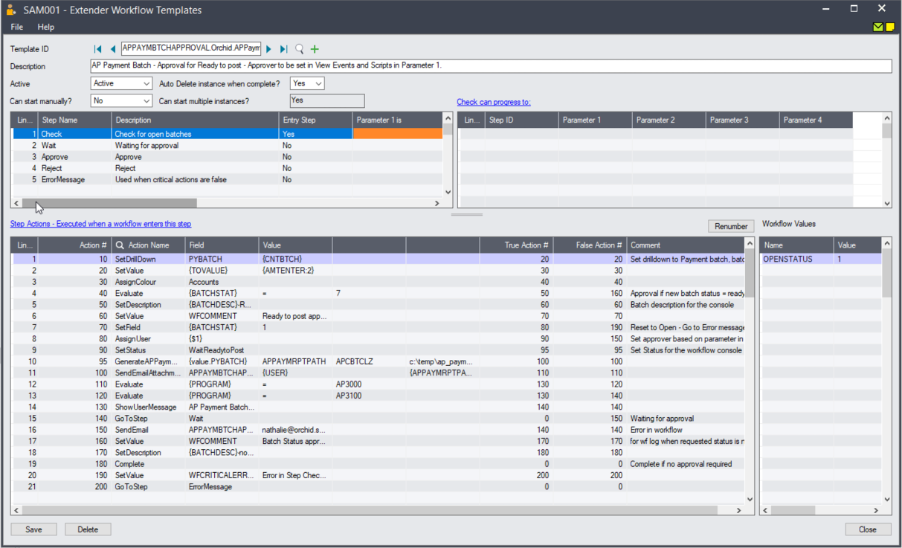
Workflow template - Step by step guide
It is recommended to add the main steps as defined on the process flowchart first, and then configure the detailed actions for each step.
This tutorial highlights details about some important workflow actions. It is not a detailed training of each workflow action used in this template. For more details on workflow templates and actions, refer to For details, refer to Workflow Templates - Screen Guide.
- The template name includes the Module ID for ease of deployment. The name cannot be updated after it is created
set to No as the workflow will start whenever the A/P Payment Batch status changes and will be attached to the A/P Payment Batch view.
Yes as the workflow history is accessible in the log.
Yes - If you want the workflow to behave differently if there is an active pending workflow before a new one starts, use the "IfWorkflowExists" action.
Add 5 steps - The main actions for each are described below:
-
Check - Entry Step: This determine what branch the workflow should take based on the batch status that is updated and whether there is a pending workflow or not. It also sets some general values for use in the workflow console and logs. If the user tries to post the batch, the status is reset to Check creation in progress
-
Wait - Record is waiting for approval.
-
Approve - This will set the Batch to "Ready to Post" and the batch will be posted
-
Reject - Rejecting user to enter a comment. The batch status is reset to Open
-
ErrorMessage - Used to demonstrate a suggested approach to cater for error handling in workflow, for example if Sage security settings prevent a user from completing a workflow action.
Progress-to steps are used when a user needs to select the next Step to progress the workflow. Progress-to steps add Controls to the workflow console. If workflow screen icons are configured in Information Manager, Progress-to steps can be run from the configured Sage 300 screen.
For A/P Batch approval, the request can be Approved or Rejected.
-
Select the Wait Step, add 2 steps that a user can select: Approve and Reject
-
Select the ErrorMessage Step, add 2 steps so that the Admin user can Approve or Reject.
Values are used in the workflow and saved in the workflow history.
For A/P Batch Approval, the workflow will track the Batch Number to enable drill down
-
: to enable drilldown - Set in the first workflow step
-
: stores the filepath and filename of the batch listing PDF so that it can be attached to an email.
For each step, the template includes a series of actions to match the process flow requirements.
For a list of actions included with ExtenderConfigurator, refer to Configurator Actions
SetDrilldown: Set the CNTBTCH value to the current Batch Number to enable drilldown from the console
Evaluate: If the requested Batch Status is 7 / Ready to Post, Approval is required. If not 7, go to a step that sets a WFCOMMENT Value, Sets description and then complete the workflow immediately.
AssignUser: Enter the appropriate user who can set A/P Payment batches to Ready to Post
AssignColour: Enter the required colour for the workflow console.
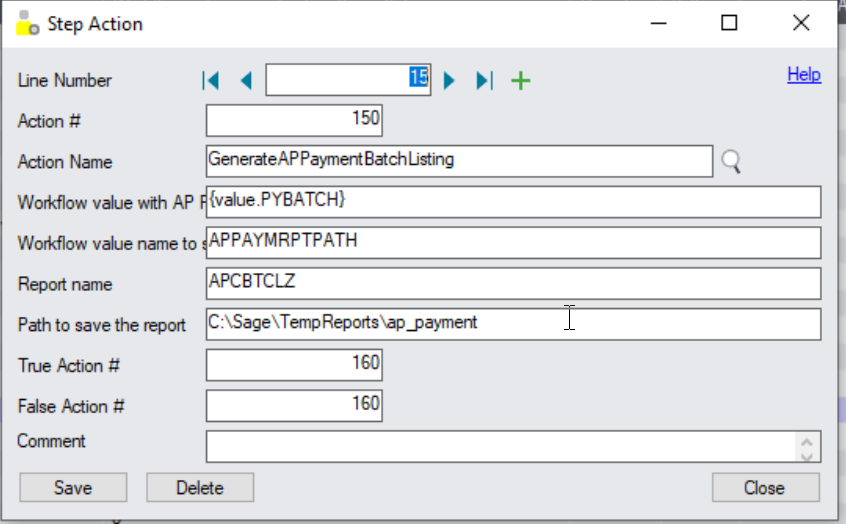
GenerateAPPaymBatchListing: This action prints the AP Batch listing report to PDF. The file is saved into the path configured in Parameter 4, the filepath and file name are stored in a workflow value defined in Parameter 2.
Tip: To modify the report used, copy the default APCBTCLZ.rpt file, update the report as required and change the Report name configured in Parameter 3. The new report must have the same parameters as the default batch listing report.
SetField: Used to restore the A/P Payment batch status to Check creation in progress until approved. - This prevents the batch from being posted and updated while a workflow is pending.
It is also used to update the Batch Description to Submitted-Original Batch Description so users can quickly scan the batch listing and view submitted and approved batches.
Tip: Make sure that the False action notifies the user that there was an issue preventing the update. If SetField is false, next action is SetValue to update the WFCRITICALERROR value, and then go to ErrorMessage Step.
SetDescription: This will be displayed on the console. Use {BATCHDESC}to show the batch description.
SendEmail: Choose a template and the User / User group or email address to use
GoToStep: Choose Wait step if approval is required so that users can Approve or Reject on the console.
Complete: Action to complete the workflow, Selected If Evaluate is false, Action = Complete
Tip: If you want to send email notification to the approver, create a message template and add a SendEmail action.
This step has no action, as it is waiting for a User to progress the workflow.
AddParameter: Optionally add a field if you want the user to enter a comment:
- APPRCOMMENT: for approver to enter a comment
AskForParameters: always required after AddParameter to display the popup screen and wait for user to enter Input.
SetField: This action will set the Batch status to 7, Ready to post.
The True action can complete the workflow.
False Action: this means the batch status wasn't updated (for example, the approver doesn't have rights to Sage 300). Make sure this goes back to the Wait step and doesn't complete the workflow. False Action could be "SendEmail" to an Admin user and then go back to "Wait" step.
SendEmailToStarter: Select a template. The action will use the email address in the Sage 300 user profile of the user who started the workflow.
GoToStep: Go back to Wait if the field update has not been successful.
AddParameter: Add a field:
- REJECTREASON: for user to enter a comment / reason for rejection
AskForParameters: always required after AddParameter to display the popup screen and wait for user to enter Input.
SetField: This action will set the Batch status to 1, Open.
SendEmailToStarter: Select a template. The action will use the email address in the Sage 300 user profile of the user who started the workflow.
Complete: Completes the workflow. Will be deleted from the Console if "Auto delete"is set to Yes.
If a user tries to set the batch to "Ready to post" again, a new workflow will start.
SendEmail: Select a User and a template. The action will use the email address in the Sage 300 user profile of the user who started the workflow.
Selected template to include {WFCRITICALERROR} value. Value updated in the workflow with details of the error.
testing Extender workflow setup
The workflow starts when the A/P Payment Batch Status is updated (by a user on a Sage 300 screen or by an import or a custom process using the Sage 300 Views).
Start the workflow
Log on to Sage 300 and set an A/P Payment batch to "Ready to Post".
The workflow is started and the batch status is reset to "Check creation in progress".
Approve or Reject the A/P Payment Batch
-
Logon to Sage 300 as a user who can approve
-
User needs to be set as a workflow user (in Extender License screen)
-
User needs rights to post an AP Payment batch in Sage 300
.
-
-
Go to Extender Workflow > Console, notice the workflow instance record.
-
Click on Values Tab to see the details.
-
Use history to view the steps that the workflow has been following.
-
Click Approve on the Workflow Console -
-
This will post the batch and
-
Send an email to the user who requested the approval.
-
-
View the Extender Inquiries > Workflow Details Log
-
Review the history of the batch being set to "Ready to Post" and approved.
-
Drilldown to the AP Payment batch to check that the batch is posted
-
-
Create another batch and repeat steps. Choose Reject on the console.
-
This sets the batch to Open again.
-
Amend the batch and set Ready to Post again.
-
Approve the batch on the console.
-
Review the Workflow Logs in Extender Inquiries
-

Repeat the steps
Optionally, Configure Information Manager
If you want to configure icons on Sage 300 screens to progress the workflow and to view workflow history, you need to configure Information Manager.
-
Install and activate Information Manager for your version of Sage 300.
-
Setup I/M Options for Extender Workflow. For details, Extender Workflow- Notes/DML/Extender Tray
To view the workflow history and progress active workflow from the AP Payment /screen, configure Information Manager , I/M Setup > Options > Notes/DML/Extender hotkey
As the workflow cannot be started manually, do not select an Entry Step.
A/P Payment Batch workflow on A/P Payment batch screen
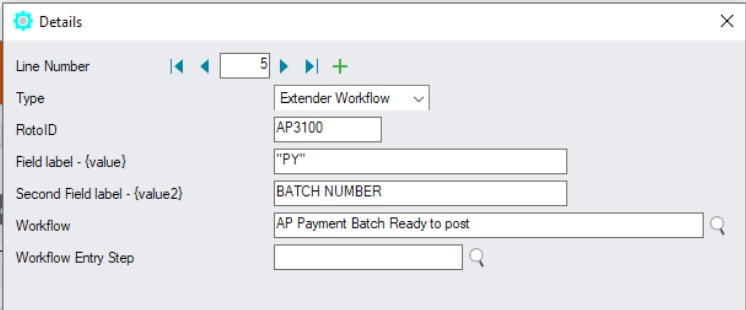
The A/P Payment batch view has a multi-part key, including the Batch Type and the Batch Number. The workflow key is set to PY,Batch number, so the Information Manager configuration needs to include 2 fields as shown below.
Field 1 should be set to "PY" (with quotes) and field 2 set to BATCH NUMBER.
Log on as a user who can approve and is configured as a Workflow User,
-
Find the A/P Payment Batch or drill down from the console
-
Click on the Workflow icon, select Reject
-
Enter a reason
-
Confirm the email is sent to the user who started the workflow.
Software Required
This functionality is available in Extender Levels Configurator and Developer.
To use the Workflow console, configure the user as a "Workflow User". Refer to Understanding Workflow Users
To use the Tray Icon on the Sage 300 screens, you need to install Information Manager, configure the tray icons and configure the user as a "Workflow User".
Using with Remote Action Service
If you want to use the Remote Action module to approve records outside of Sage 300, you need to download and install the Remote Action Module on the Orchid website through your Sage 300 partner.
You can then use the AP Approval Extender module below.
AP Payment Batch Approval Module with Remote Action