Extender Workflow- Notes/DML/Extender Tray
You configure an Extender Workflow row to add Workflow icons to a Sage 300 screen.
The icons allow Workflow User to start a workflow if it can be manually started, progress a workflow to the next step if you are an approver, and view the workflow status and workflow history.
Workflow icons only show if a workflow is configured on a specific field.
One or no workflow icon can be present per screen. Subject to Sage 300 security rights, you can use the icons to view the workflow history.
Depending on the workflow configuration, you can also use the icons to start or progress the workflow.
![]() Click to start manual workflow or view workflow history. There is no pending workflow.
Click to start manual workflow or view workflow history. There is no pending workflow.
![]() Click to view active workflow. The pending workflow is not assigned to the logged on user.
Click to view active workflow. The pending workflow is not assigned to the logged on user.
![]() Click to progress your active workflow. The workflow is assigned to the logged in user and waiting for an action.
Click to progress your active workflow. The workflow is assigned to the logged in user and waiting for an action.
![]() Click to progress group active workflow. The workflow is assigned to a workflow user group that the logged in user is part of. The workflow is waiting for an action from one of the group member.
Click to progress group active workflow. The workflow is assigned to a workflow user group that the logged in user is part of. The workflow is waiting for an action from one of the group member.
Note: If the workflow icons are not configured in Information Manager Options, users can run the workflow Log reports to view workflow history. Workflow users can use the workflow console to view and progress their active workflows.
Configure Tray
Select Extender Workflow Note Type -Alert Based on Extender Script (For further details on note type, view below)
Fields and Controls
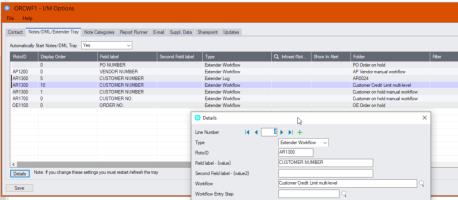
Enter the RotoID of the screen that should display the Extender Workflow Icons.
Example: Enter RotoID AR1300 to display a A/R Customer workflow on the A/R Customer screen.
Tip: To know what RotoID/Field label to use, start the appropriate Sage 300 Screen (for example AR Customers) then Right hand mouse click on the Information Manager Tray Icon (the key). Now, as you click on fields in the Sage 300 Screen - the Infoset Hotkey Setup shows you the RotoID and Field Name.

Enter the field label from the Sage 300 screen which is to trigger the display of the Extender Workflow icons.
If the Field Label is entered with quotes, e.g. "PY", Information Manager will use the hard coded value in addition to the value set in the Second Field Label.
1. The same field may have different labels on different screens. See Example 1 below
2. The same field label may be used on the Header and Grid component of the same screen. See Example 2 below. Adding "F."to the field label forces it to use the field control and "G." forces it to use the grid control.
1. In AR Receipt Entry there are two Document Number fields - one on the header and one in the grid. To force the tray to use the correct one, you should use "F.DOCUMENT NUMBER" for the screen label or "G.DOCUMENT NUMBER" for the grid field label. .
2. If you want the same list of documents to show on both the AR Customer Screen and the AR Customer Inquiry, you need to add two rows in the IM Setup\Options on the Notes/DML/Extender Tray tab. One for the Field Label “CUSTOMER NUMBER” and one for the Field Label “CUSTOMER NO.”
Enter the second field label from the Sage 300 screen which is to trigger the display of the Extender Workflow icons. If entered, then the document list will displayed for Field 1 = Field label and Field 2 = Second Field Label.
Second Field Label is optional and is configured in the same manner as the Field Label.
Browse to select the Extender Workflow template to be added to the Sage 300 screen.
The workflow needs to be attached to a Sage 300 view that is related to the screen the icon is attached to.
Workflow Templates - Screen Guide
Note: This requires Orchid Extender and the Workflow must be configured in Extender. Refer to Extender Documentation for details.
If the workflow template "Can be started manually" is set to "Yes", select an Entry Step. This will enable users to start the workflow manually from the screen.
If the workflow template "Can be started manually" is set to "No", don't select an entry step. Th workflow will be started automatically if configured in View Events and Scripts and you can view the Workflow Log and progress the workflow from the screen.
Examples
A/R Customer workflow on A/R Screens
If you have an A/R Credit Limit approval workflow, you can add the icons to selected screens:
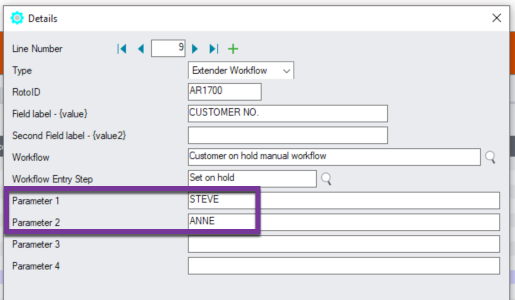
- A/R Customer Screen- RotoID = AR1300 and Field Label = Customer Number
- A/R Customer Inquiry screen - RotoID = 1700, and field label = Customer No

A/P Payment Batch workflow on A/P Payment batch screen
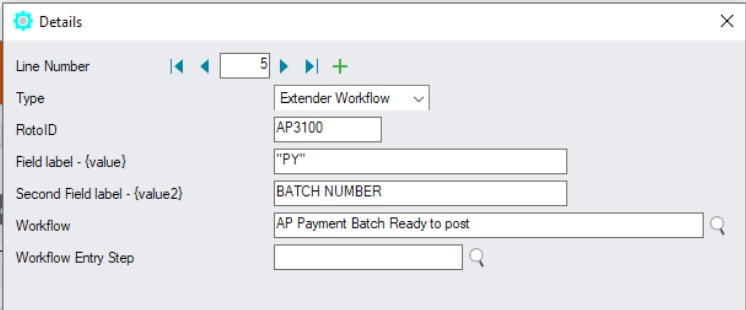
The A/P Payment batch view has a multi-part key, including the Batch Type and the Batch Number. The workflow key is set to PY,Batch number, so the Information Manager configuration needs to include 2 fields as shown below.
Field 1 should be set to "PY" (with quotes) and field 2 set to BATCH NUMBER.

Selecting this option requires Orchid Extender and Information Manager to be installed and activated.
To use the functionality, a user needs to be flagged as a Workflow User. For details on functionality and licensing method, refer to Understanding Workflow Users
If the Information Manager Tray is not started, the icons will not show and the user will not be able to use the workflow icons to start or progress the workflow.
However, workflows attached to view operation or view field changes will be started and users configured as Understanding Workflow Users are able to access the Workflow Console.
You can start the tray manually in Information Manager > Tray Icon.

