P/O Requisitions and Purchase Order Approval
Overview
A company wants only certain users to approve Purchase Requisitions and Purchase Orders entered in Sage 300 P/O Module. They configure workflow using Orchid Extender to control who can approve Purchase Requisitions and Purchase Orders.
This P/O Approval workflow module is designed to be started automatically when Purchase Requisitions and Purchase Orders are posted in Sage 300. The process is similar for P/O Requisitions and P/O Purchase Orders.
When a user posts a Requisition or a Purchase Order, the workflow sets the Requisition and Purchase Order on hold until the request is approved.
This ensures the Requisition cannot be converted to a Purchase Order and the Purchase Order cannot be printed or receipted.
When the Requisition is approved, the workflow converts it to a Purchase Order automatically. You can configure the workflow template to auto-approve or if required, a new approval process can start for the Purchase Order .
When the Requisition or Purchase order is rejected, the status is remains On Hold. Users can update the requisition, and try to take it off-hold to submitted it for approval again.
Sample files
You can import the P/O Approval Workflow sample module. It includes a workflow template for P/O Requisitions and one for P/O Purchase Orders and required message templates.
The P/O Requisition workflow template is attached to the P/O Requisition ONHOLD field. The P/O Purchase Order template is attached to the P/O Purchase Order ONHOLD field.
Download the PO Approval Module
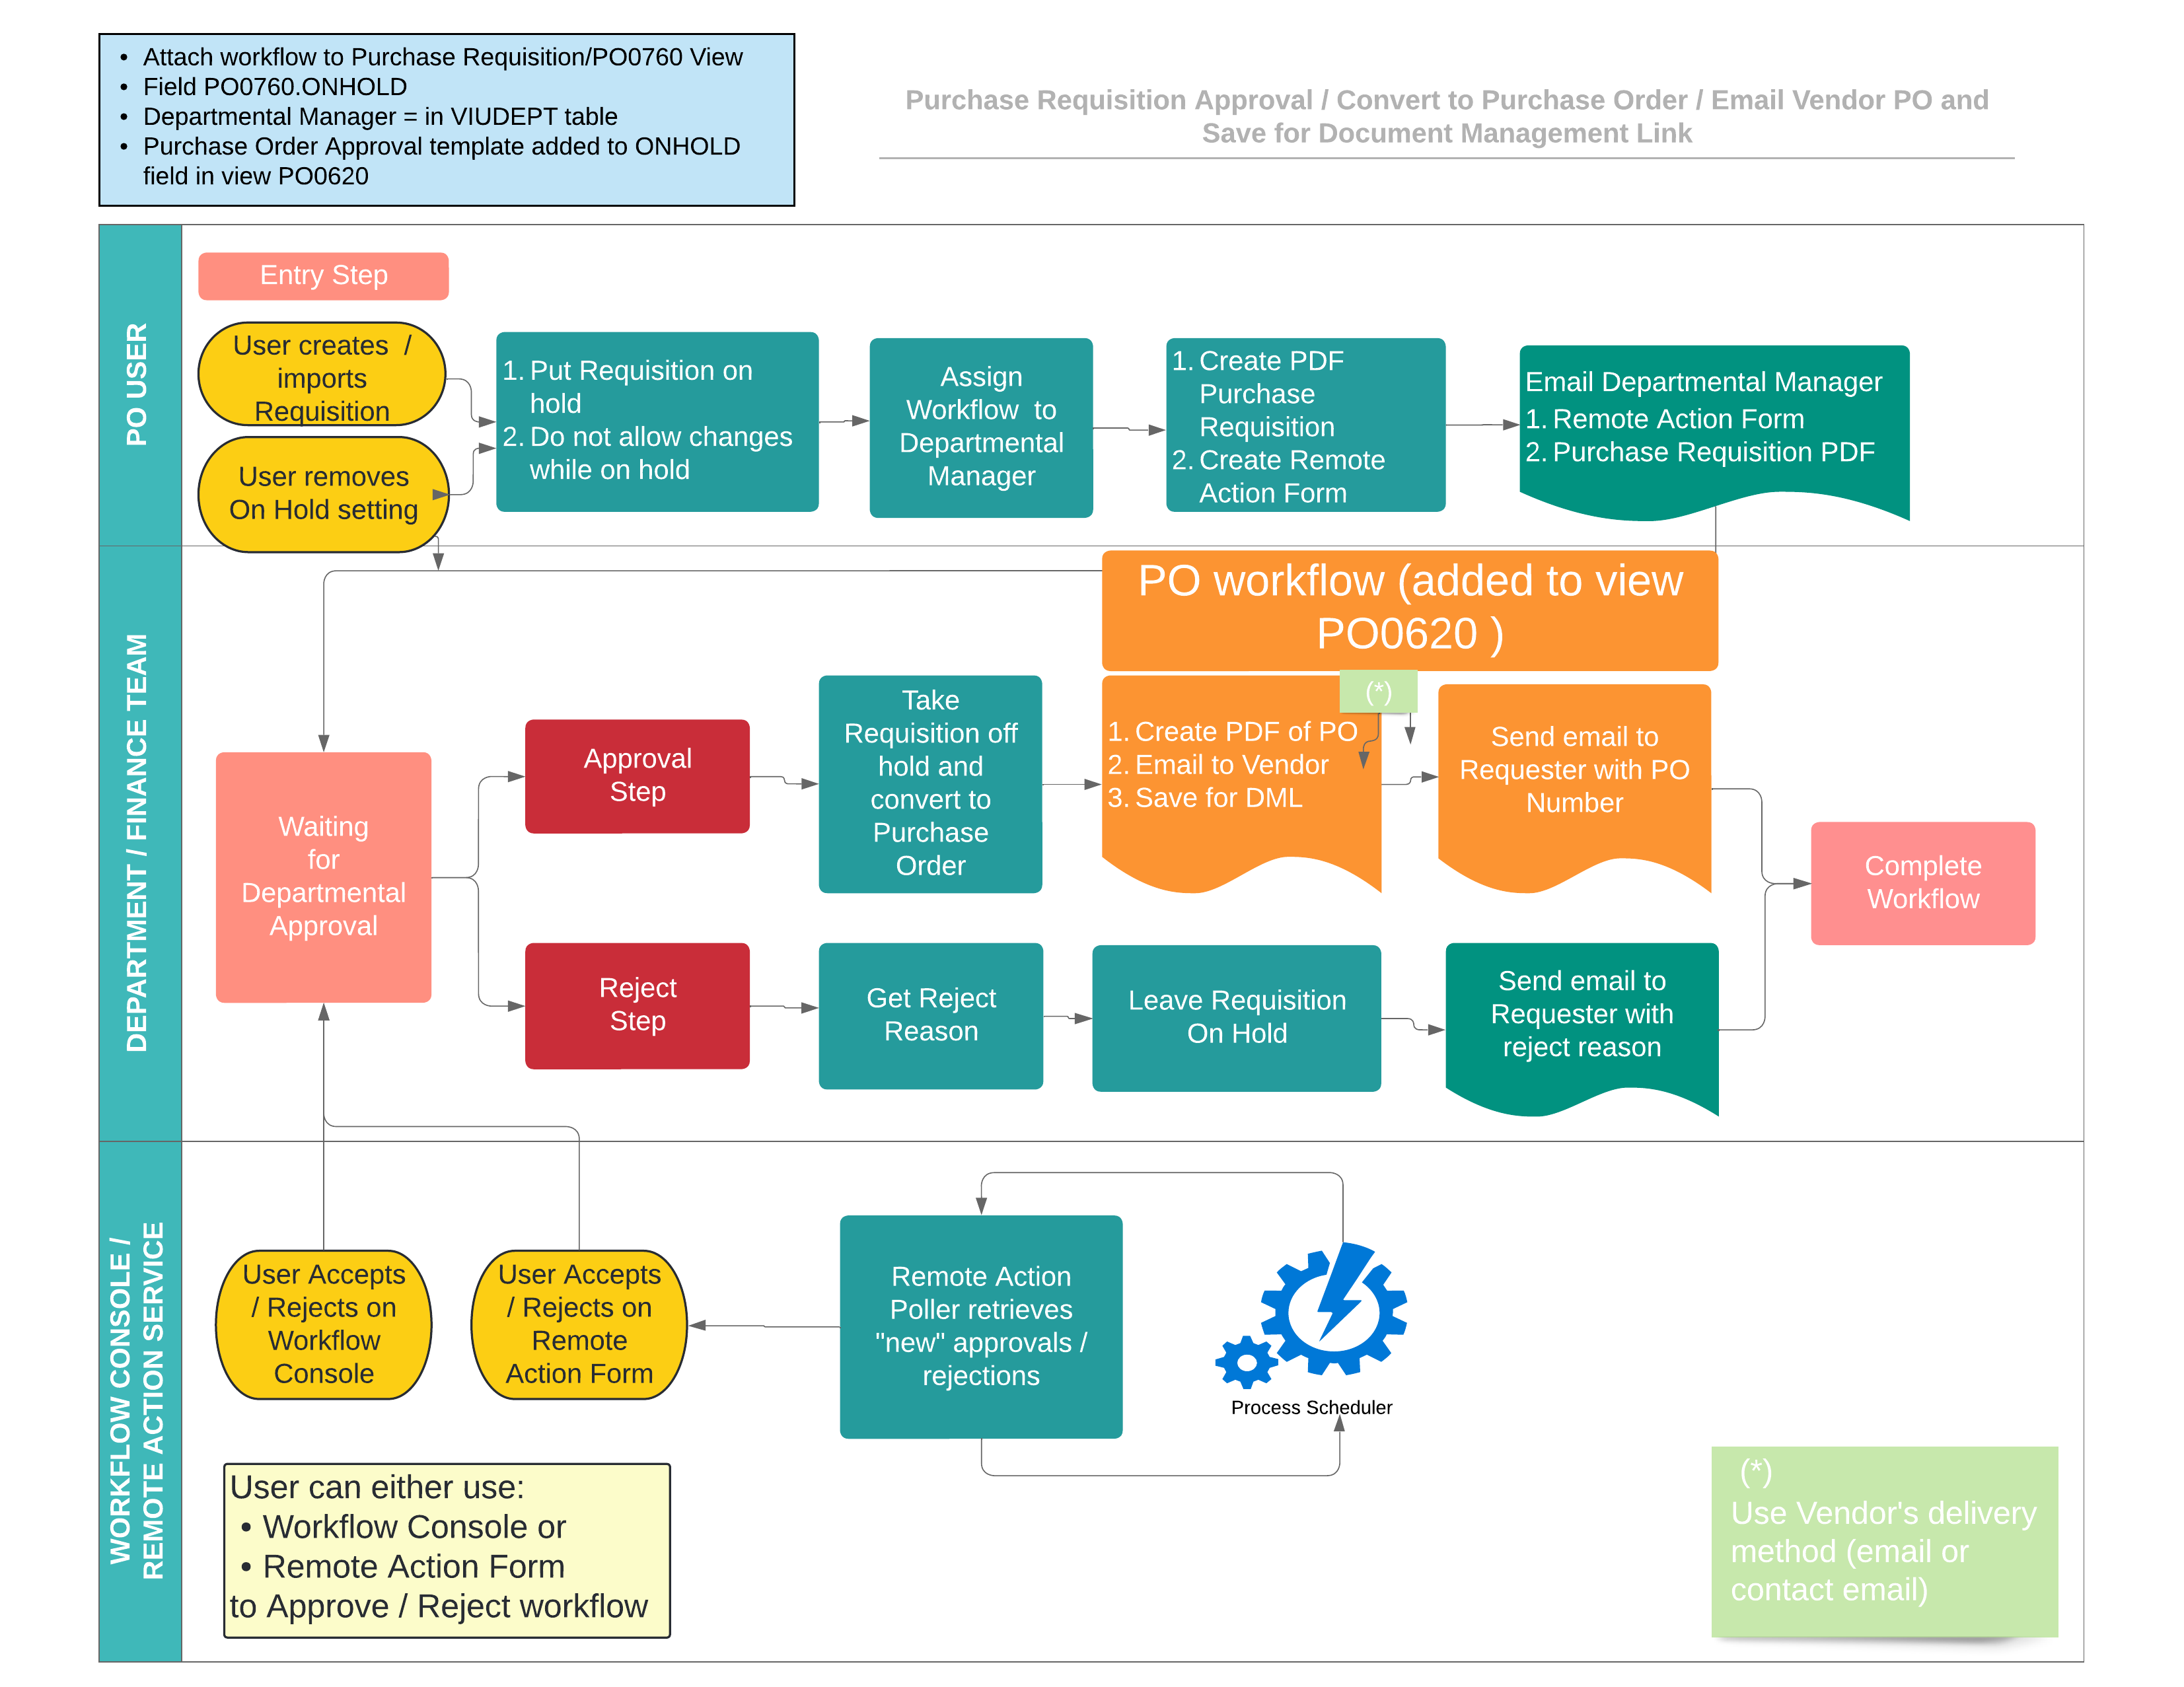
Flowchart
The flowchart is a high level representation of approval process for the Purchase Requisition to Purchase Order. It doesn't include all the options for all the steps.
Note: The module is supplied on an as is basis for training and demonstration purposes only and is not supported by Orchid Systems. If this code is deployed in a live production environment it is the responsibility of the End User to ensure that it is operating as required.
EXTENDER SETUP KEY STEPS
To start using the P/O Approval module, you need to follow the steps below:
Step 1. Configure SMTP Email settings in Extender Options
This is required for the workflow to send emails to users, that an approval is required and when a P/O is approved or rejected.
Refer to Extender Email Tab
Step 2. Configure Workflow Users
All Sage 300 users who need to approve P/O Records on the workflow console need to be set as Workflow Users. Extender License and Workflow Users
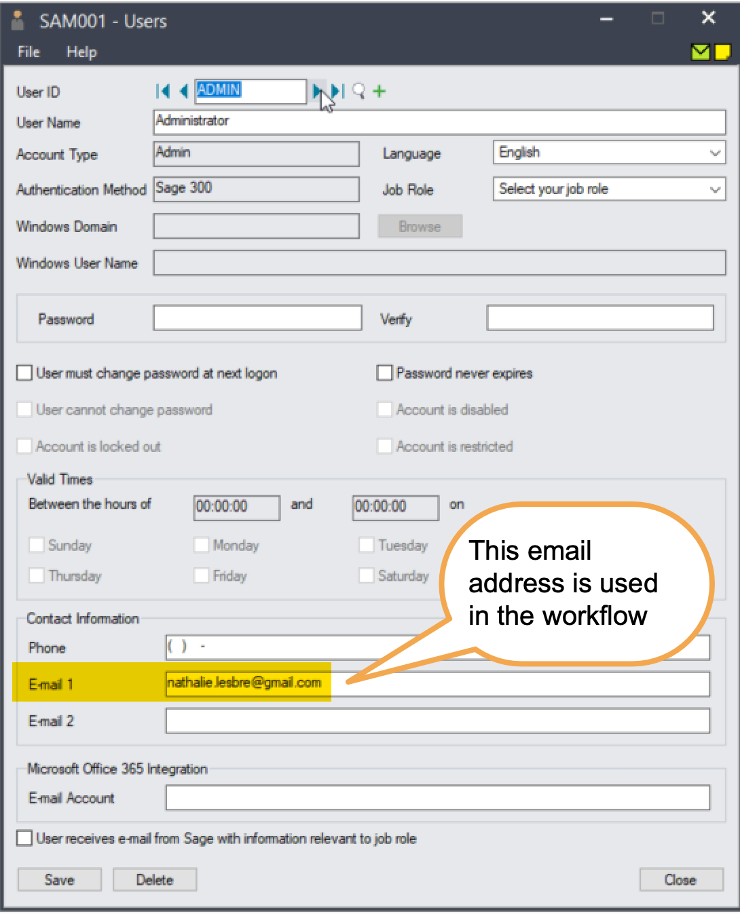
Check Sage 300 users email addresses
Step 3. Create Workflow User Group
Create a workflow user group called PURCHASESMGR. You can add the required Sage 300 users to that group. Refer to Workflow User Groups for details.
If you don't create a workflow user group, you can select a Sage 300 user as the approver. See Step 6 below.
Step 4. Add Workflow colours
The P/O approval uses 2 colours: wfError* if there are any errors, and PURCHASES for regular workflow records on the Console.
You can choose the colour you want for the console, as long as you create Workflow Colours with the same names. (Workflow Colours).
Step 5. Import the PO Approval.vi file
It will create 2 workflow templates, message templates and link the workflow to the PO Requisition and PO Purchase Order Header view.
Step 6. Configure the PO approval module - Print settings
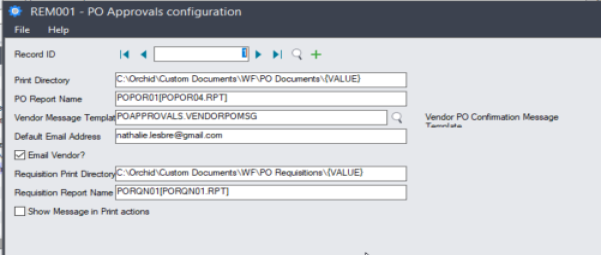
In the PO Approval Print configuration table, you can configure the path where the workflow saves the PO and PO Requisition PDF files, typically in a in a folder per vendor.
You also select the message template used to email vendors based on the AP Vendor delivery method.
The PO Approvals module prints the PO Requisition and the PO Purchase Order as a PDF Report, saved on the server. Optionally, the workflow can email the vendor based on the AP Vendor delivery method.
To configure the Print options, go to Extender Setup, select Custom table Editor, POAPPROVALS Configuration, and Load
Create a new record, set Record ID = 1.
|
Record ID |
1 |
|
Print Directory |
Path where you want to save the PO Purchase Order PDF. Include {VALUE} in the path to create a folder per vendor Select UNC path so that all. Users can access the folder. Example: C:\Orchid\Custom Documents\WF\PO Documents\{VALUE} |
|
PO Report Name |
Report Group and Crystal Report file name (group is from the PORPT.ini file). Crystal Report cannot be a data pipe report POPOR01[POPOR04.RPT] |
|
Vendor Message Template |
POAPPROVALS.VENDORPOMSG is the default message in the module. You can amend the default message or create a new one and change the configuration. |
|
Default Email Address |
Admin user email address to use when the Vendor’s delivery method is set to Email or Email Contact, but there is no valid email. |
|
Email Vendor? |
Select if you want to email the vendor based on the AP Delivery method. If the Vendor’s delivery method is set to Mail, the PDF is saved, but no email is sent. |
|
Requisition Print Directory |
Path where you want to save the PO Requisition PDF. Include {VALUE} in the path to create a folder per vendor. C:\Orchid\Custom Documents\WF\PO Requisitions\{VALUE} |
|
Requisition Report Name |
Report Group and Crystal Report file name (group is from the PORPT.ini file). Crystal Report cannot be a data pipe report. PORQN01[PORQN01.RPT] |
|
Show Message in Print Actions |
Select to view a confirmation message on the screen after the PDF is printed and the vendor is emailed. Useful for testing. Generally don’t select it in production server. You can see the value where the PDF is saved in the workflow logs. |
Step 7. Configure the PO approval module - User delegated amount and manager
In Extender Setup > Custom Table Editor, select the POAPPROVALS.VIUSDEPT table.
Each user has a delegation of authority: Transactions below this amount do not require approval. If you want all P/O and all Requisitions to be approved, set the value to 0.
For all users creating P/O, select their manager.
Select Custom Table Editor in Extender Setup.
-
Select User Dept Delegated Amt
-
Load
-
Create a new record for all users who will be creating PO Requisitions and PO. Select the delegated amount and the Manager User ID. Below the delegated amount, the PO goes straight to the Controller for approval, above the delegated amount, the manager needs to approve first.
-
Save

Step 8. Configure approving user
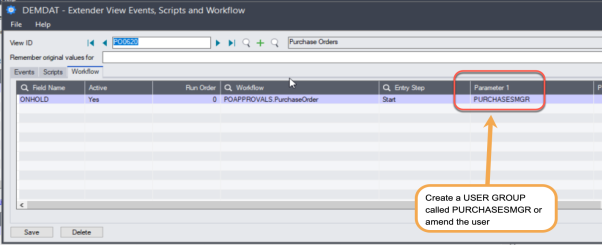
This setting is used for Purchase Requisitions and for Purchase Orders that are not linked to requisitions.
This is configured in View Events, Scripts and workflow
PO requisition– Parameter 1 = Sage 300 user or workflow user group who approves after the manager.

Step 9. Optionally, configure module to use Remote Action in workflow template
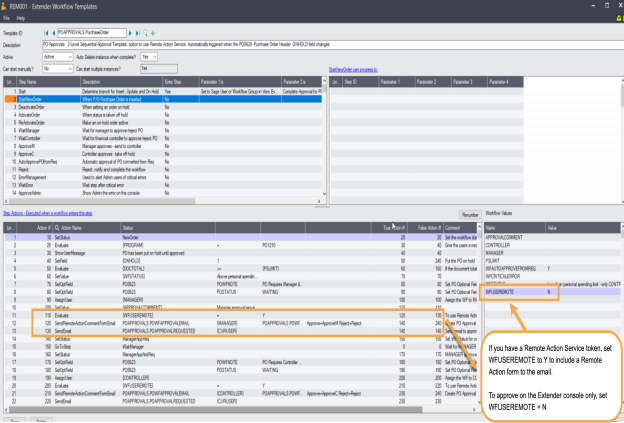
If you want to start using Remote Action Service and have purchased a Remote Action Subscription, you can set the value WFUSEREMOTE = Y in the required Workflow Template.
|
Workflow Template |
PO Requisition |
PO Purchase Order |
|
Default Value Use Remote Action |
N |
N |
|
To use Remote Action in Requisition, but not in Purchase Order |
Y |
N |
| To use Remote Action in Purchase Order, not in requisition | N | Y |
| To use Remote Action in both | Y | Y |
Check the WFUSEREMOTE value (in the panel in the bottom right) in both workflow templates
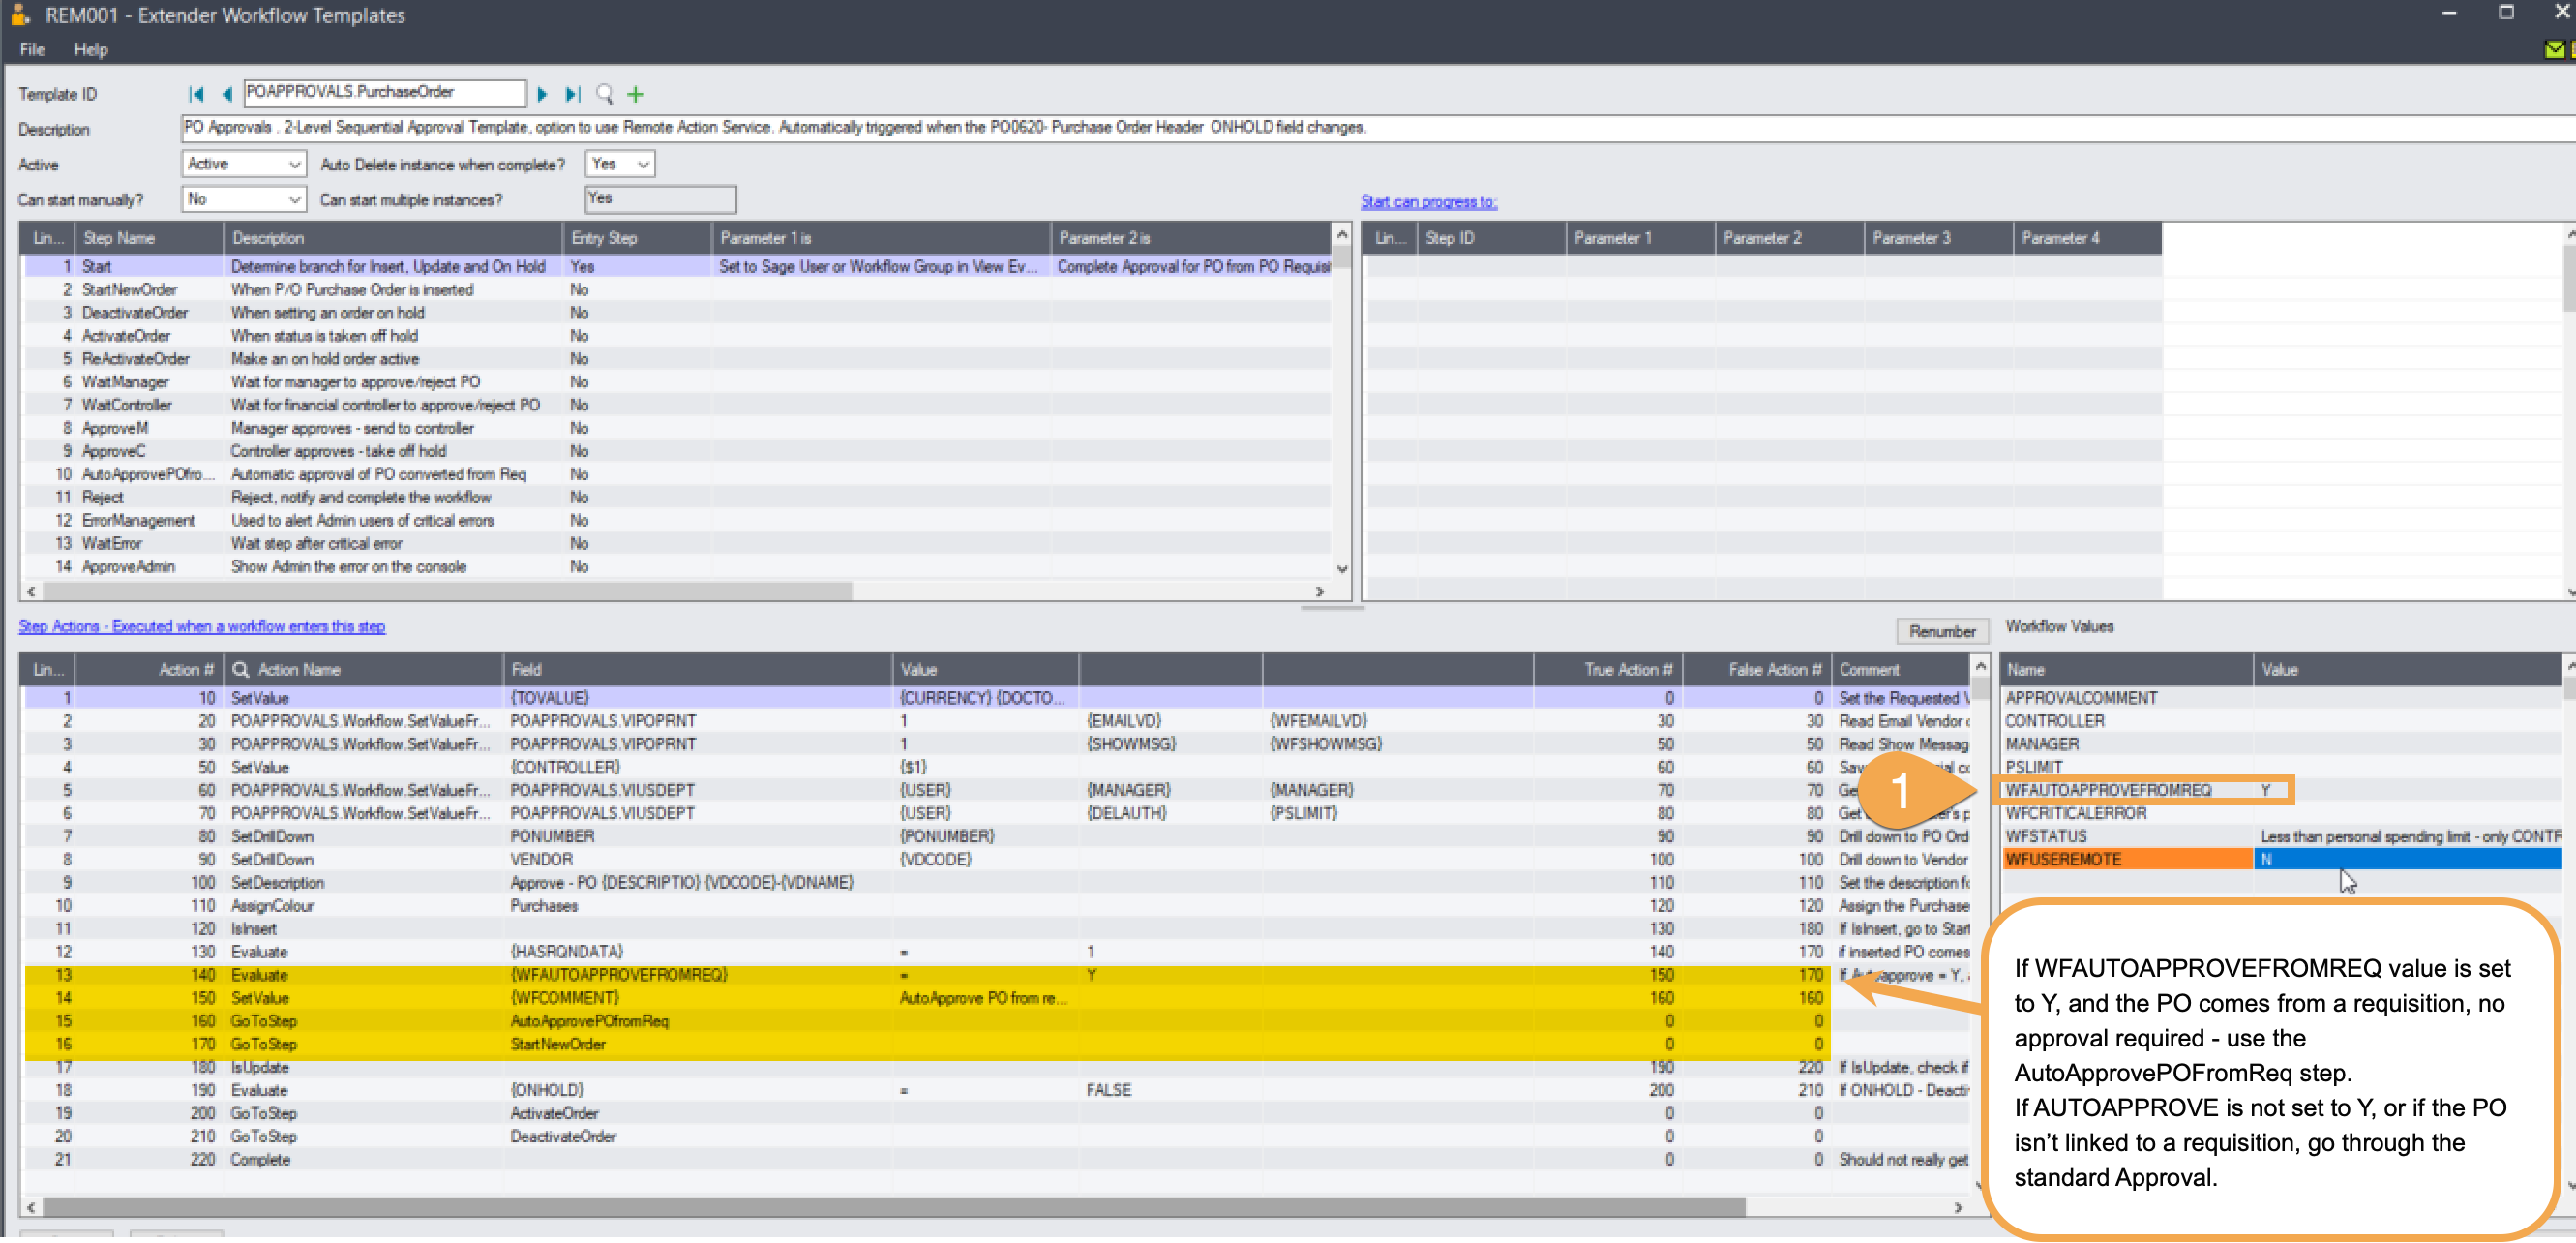
Step 10. Auto approve PO from requisitions –
This is configured in the POAPPROVALS.PO Purchase Order workflow template. It applies only to PO Purchase Order Approval
You can set the value to N if you want a new approval process for Purchase Orders created from requisitions.
Workflow template - Step by step guide
It is recommended to add the main steps as defined on the process flowchart first, and then configure the detailed actions for each step.
This tutorial highlights details about some important workflow actions. It is not a detailed training of each workflow action used in this template. For more details on workflow templates and actions, refer to For details, refer to Workflow Templates - Screen Guide.
- The template name includes the Module ID for ease of deployment. The name cannot be updated after it is created
set to No as the workflow will start whenever the PO on hold status changes.
Yes as the workflow history is accessible in the log.
Workflow includes 8 main steps - The main actions for each are described below:
-
Start- Entry Step: This determine what branch the workflow should take based on the PO / Requisition status that is updated and whether there is a pending workflow or not. It also sets some general values for use in the workflow console and logs. If the user tries to change the On Hold field, the status is reset to On Hold.
-
- When a PO or a Requisition is inserted
-
- When the user sets the status to OnHold , this step completes the workflow automatically. No approval, the record remains on hold.
-
- When the user sets the OnHold field to "Off hold". If there is a pending workflow, the user is informed and the PO/ Requisition remains on hold. If there is no pending workflow, the PO/Requisition is printed and an email is sent. In both cases, the PO/Requisition remains on hold.
-
Wait - Record is waiting for approval.
-
Approve - This will set the Requisition to Off hold and create a PO. If AutoApprove PO from Requisition is set to Y, the PO is automatically approved. The Workflow creates a PDF and emails the Vendor, if the Print Configuration table "Email Vendor" field is selected.
-
Reject - Rejecting user to enter a comment. The Requisition / PO remains on hold. User can amend the details, and resubmit by setting the OnHold Flag off on the Requisition.
-
ErrorMessage - Used to demonstrate a suggested approach to cater for error handling in workflow, for example if Sage security settings prevent a user from completing a workflow action.
Progress-to steps are used when a user needs to select the next Step to progress the workflow. Progress-to steps add Controls to the workflow console. If workflow screen icons are configured in Information Manager, Progress-to steps can be run from the configured Sage 300 screen.
In the P/O Approval workflow, the request can be Approved or Rejected.
-
Select the Wait Step, add 2 steps that a user can select: Approve and Reject
-
Select the ErrorMessage Step, add 2 steps so that the Admin user can Approve or Reject.
Values are used in the workflow and saved in the workflow history.
For PO Approval, the workflow will track the path and filename of the PDF created, the approvers, whether the Remote Action Service is used.
For each step, the template includes a series of actions to match the process flow requirements.
For a list of actions included with ExtenderConfigurator, refer to Configurator Actions
testing Extender workflow setup
The workflow starts when the PO Requisition or a Purchase Order is created. (by a user on a Sage 300 screen or by an import or a custom process using the Sage 300 Views).
Start the workflow
Log on to Sage 300 and create a new P/O Requisition. .
The workflow is started and the P/O Record is reset to "On Hold".
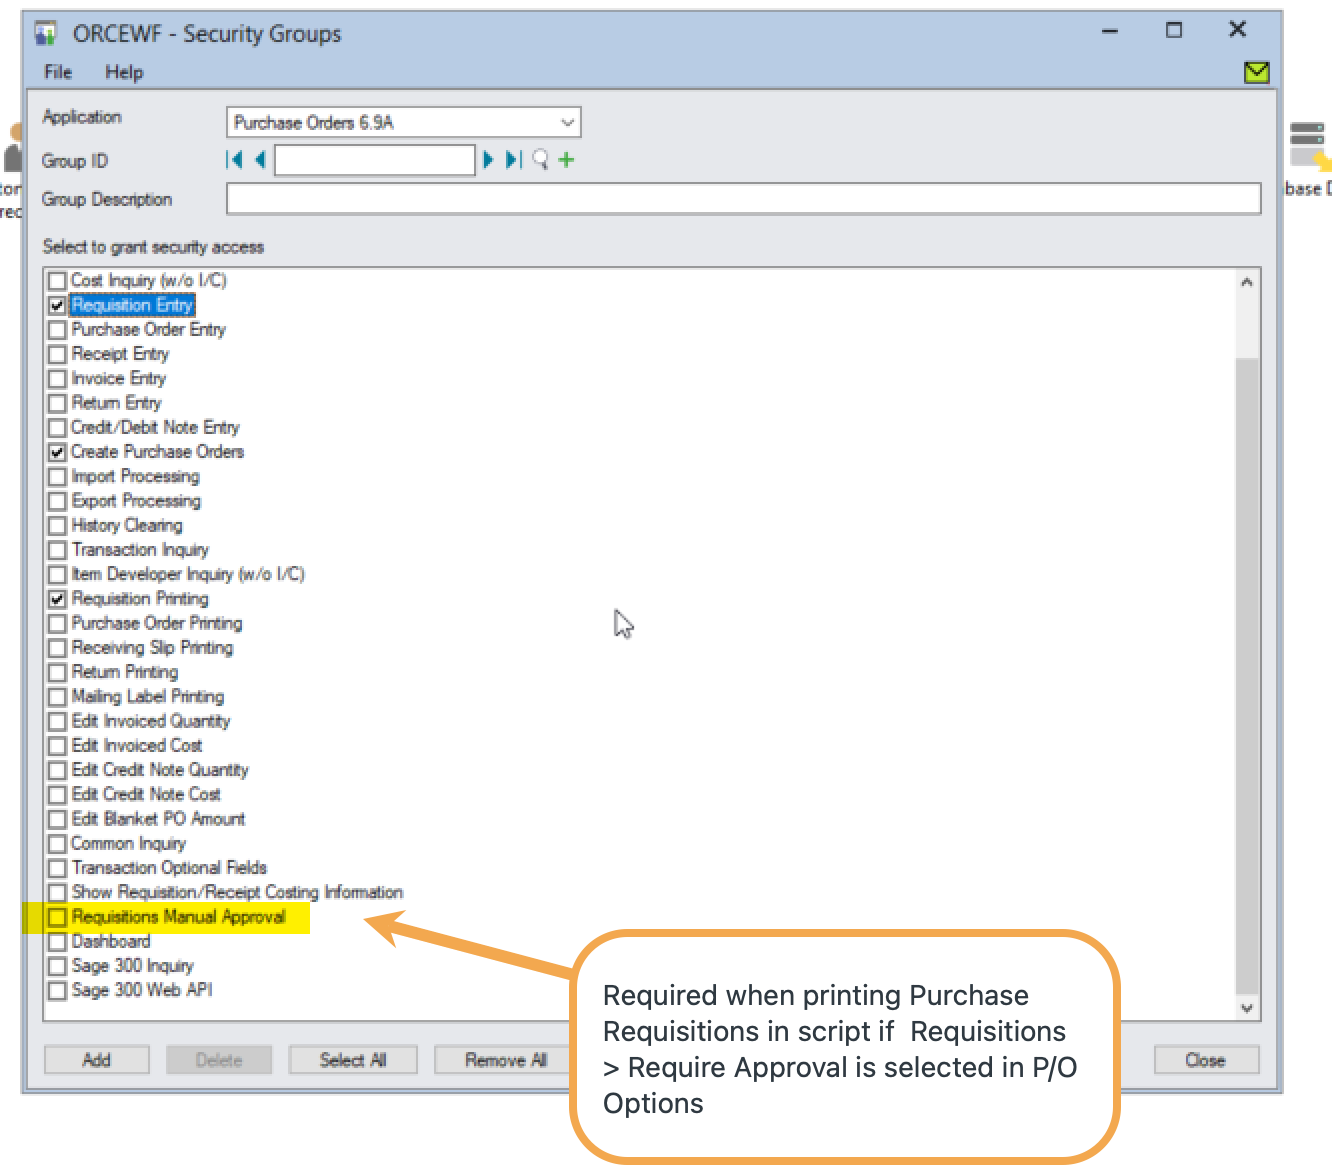
Users who create requisitions need security rights to “Requisitions Manual Approval” in Sage 300 Security Group if the “Require Approval” is selected in P/O Options. If not, the PDF generated by the workflow doesn't include any details.
Click to expand Security Group Screenshot
Approve or Reject the Purchase Order or Purchase Requisition
-
Logon to Sage 300 as a user who can approve
-
User needs to be set as a workflow user (in Extender License screen)
-
User needs to have rights to Create Purchase Orders.
-
-
Go to Extender Workflow > Console, notice the workflow instance record.
-
Click on Values Tab to see the details.
-
Use history to view the steps that the workflow has been following.
-
Click Approve on the Workflow Console -
-
This will approve the PO Requisition and create a PO
-
Send an email to the user who requested the approval.
-
-
View the Extender Inquiries > Workflow Details Log
-
Review the history of the Requisition and the Purchase Order.
-
Drilldown to the Purchase Order to check that the PO is ready.
-
-
Create another PO or Requisition and repeat steps. Choose Reject on the console.
-
This completes the workflow.
-
Amend the PO or the Requisition and de-select On Hold This restarts a workflow.
-
Approve the record on the console.
-
Review the Workflow Logs in Extender Inquiries
-
Log on as a user who can approve and is configured as a Workflow User,
-
Find the Purchase Requisition or the Purchase Order or drill down from the console
-
Click on the Workflow icon, select Reject
-
Enter a reason
-
Confirm the email is sent to the user who started the workflow.
Software Required
This functionality requires Extender Developer.
To use the Workflow console, configure the user as a "Workflow User". Refer to Understanding Workflow Users
To use the Tray Icon on the Sage 300 screens, you need to install Information Manager, configure the tray icons and configure the user as a "Workflow User".
