Setup Document Management Link
Key Steps
-
Confirm where you are going to save the documents (Network Folder, including synchronised Dropbox,Google Drive, OneDrive folders, or SharePoint).
-
List Sage 300 screens where you want to display documents.
-
Identify the Screen ID and the field labels in Sage 300 screens.
-
Add the configuration records in I/M Options
-
If using SharePoint:
-
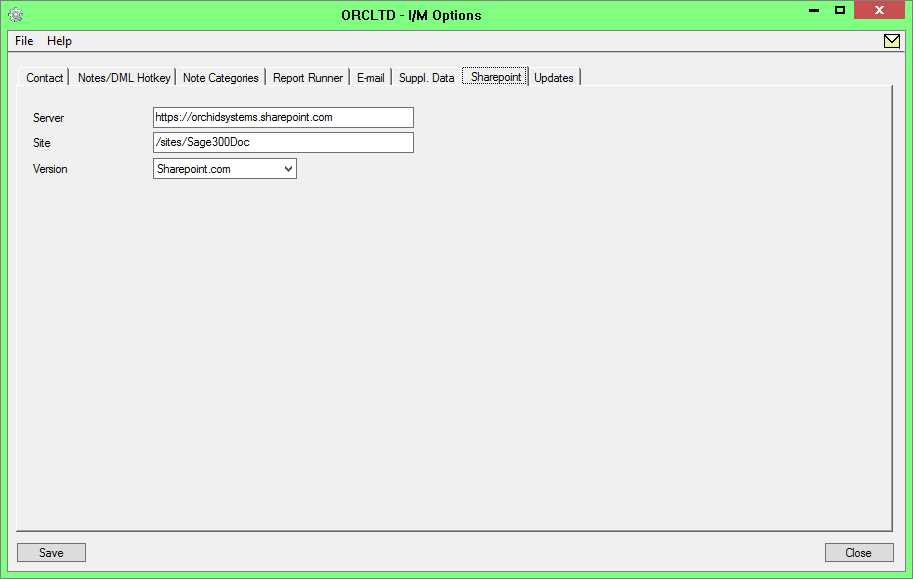
Confirm SharePoint Server name, Site and Version as well as Logon details
-
Add fields to SharePoint folders to store DML related details.
-
For a detailed example, refer to Setup Document Management Link with SharePoint for Office 365
-
-
If using the Sage 300 Web Screens, refer to additional steps Install I/M Notes and DML Web Screens Key Steps
-
Confirm which users will use Document Management Link.
-
Configure DML in I/M Options > Notes/DML/Extender Setup, save and Refresh the tray icon
-
Test
The setup steps are described in the Visual Process Flow (VPF) below followed by detailed steps. To assign VPF, see Assigning Visual Process Flows
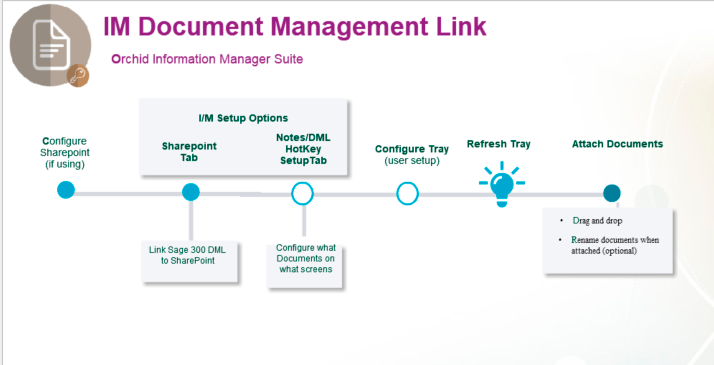
Step 1. Configure SharePoint If using it to store documents
a. Logon to SharePoint to check details and security and create required fields. Refer to Setup Document Management Link with SharePoint for Office 365
b. Use I/M Setup\ Options on the SharePoint tab to define the version of SharePoint you are using, together with the SharePoint server and site details.
Step 2. Use I/M Setup>Options> Notes/DML/Extender Tray Tab:
a. Automatically Start the Notes/DML Tray- Defaults to Yes.
Change to No if users want to start the tray manually or you want to set the configuration by user in I/M Transactions > Notes/DML user options.
b. Configure which Sage 300 Fields/Screens display documents
Note Type = Network Folder or SharePoint if using SharePoint
Enter up to 2 field labels found on the Sage 300 screens
Select the folder where documents are stored
Optionally, you can choose to show documents only on certain screens (RotoID).
If required, configure how to rename files when they are added to the Alert Box
Tip: Use the F9 / Detail screen to setup the configuration as this will show you the required fields for each Note type.
Step 3. Add users who have access to DML
There is no specific Sage 300 security for DML.
Note: Security is configured through users' access to the folders that are configured in DML. So there is no DML specific security configuration.
You add users in the I/M License screen.
Enable a Sage 300 user as a DML User
- Add Sage 300 users who need to access Document Management Link in the Information Manager License Screen.
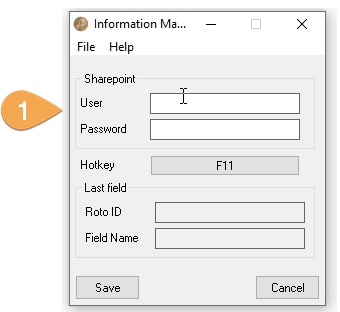
- If using SharePoint without multi-factor authentication, enter the SharePoint logon details in the tray.
Requirement! This applies to the latest Information Manager product updates, PU13.00 and above for version 2022 and above (released December 2024).
In earlier versions, DML users were configured on the Information Manager Tray. You may need to use the DML User flag on the tray if using an older product update of Information Manager.
For details Refer to Enable a Sage 300 user as a DML User in the System Tray
Refresh the Tray icon if you have made any changes on the IM Setup>Options in the current session as the Tray icon reads the current setup when the company is first opened.
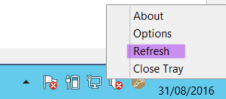
Tip: If you have multiple Tray icons, Close the Sage 300 desktop and re-open to refresh the configuration.