Install and Configure Information Manager Web Tray
In this section::
How does the Web Tray work?
Orchid InfoManager Web Service
When a user logs on to Sage 300 using the web screens, the IIS Module will forward DML requests to the Orchid InfoManager Web Service.
The service connects to the Sage 300 database to display Notes and Documents in the web tray as per the configuration in I/M Options and based on the logged on user's security profiles.
If the Orchid InfoManager Web Service isn't running, you will not see any Web Tray icons on the web screens.
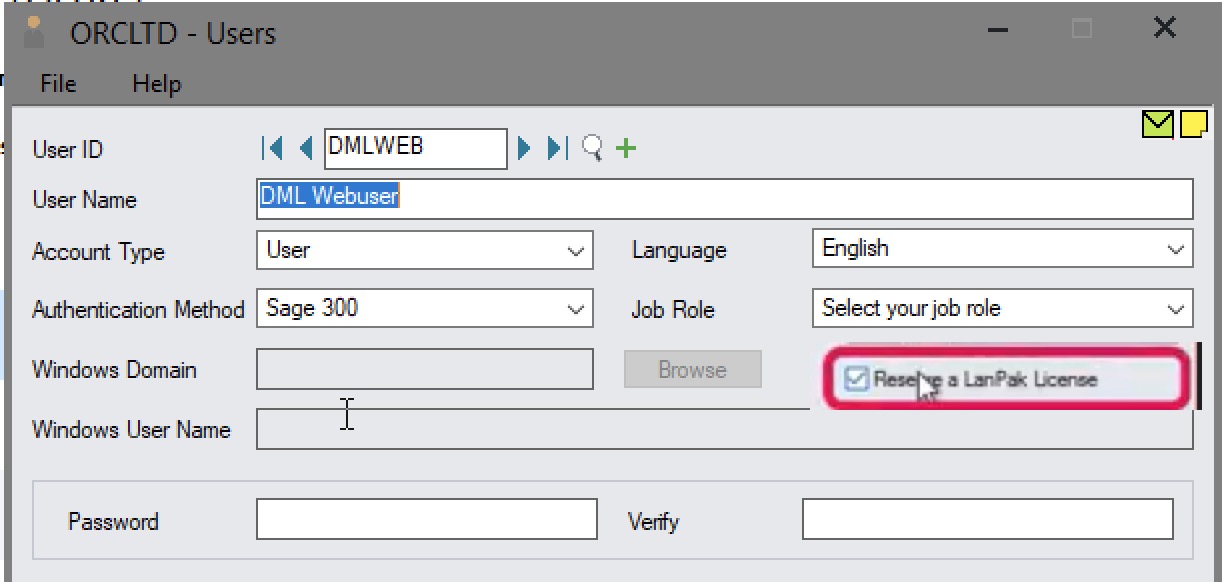
LanPak
The Orchid InfoManager Web Servicerequires a Sage 300 LanPak to connect to the Sage 300 database.
Note: Reserve a LanPak for use with the Orchid InfoManager Web Service to ensure access to the functionality.
Web Tray Installation Overview
This step needs to be done on the server where Sage 300 web screens are configured (where IIS runs).
You need to log on to Sage 300 Desktop Screens as ADMIN and have full Admin rights to the server where the Sage 300 web screens are installed.
You only need to do the steps below once per site, (not per database).
This steps assumes that you have completed the previous steps to install Information Manager.
For details Install I/M Notes and DML Web Screens prerequisites
Before you configure
It is recommended to create a dedicated Windows user and a Sage 300 user to facilitate security setup and auditability.
Create a Windows network user
Create a Windows network user to run the Orchid InfoManager Web Service.
The network user needs Read access to the Sage 300 program folder and Read/Write access to the Sage 300 Shared Data folder.
If using Document Management Link, the Windows network user needs read, write and delete rights to the folders where documents are saved.
Create a Sage 300 user
Create a dedicated Sage 300 user for use in the Orchid InfoManager Web Service.
The Sage 300 user configured in the Orchid InfoManager Web Service doesn't need any specific security rights in Sage 300 Administrative Services.
The Orchid InfoManager Web Servicerequires a Sage 300 LanPak to connect to the Sage 300 database.
Note: Reserve a LanPak for use with the Orchid InfoManager Web Service to ensure access to the functionality.
Security Considerations
Notes
For Notes, the Web Tray relies on the security profile and the Notes User Roles (see Setup User Roles) of the Sage 300 user logged on to the web screens.
Document Management Link
For Document Management Link, the Web Tray uses the Windows security rights of the network user running the Orchid InfoManager Web Service. The Windows network user needs read, write and delete rights to the folders where documents are saved.
Configure the Web Tray
Step 1. In Sage 300, go to I/M Options > Web Tray Tab
-
Log in as the ADMIN user with a network user that has full Administrator rights to the server where Sage 300 web screens are installed.
-
In I/M Options, use the Web Tray tab (1)
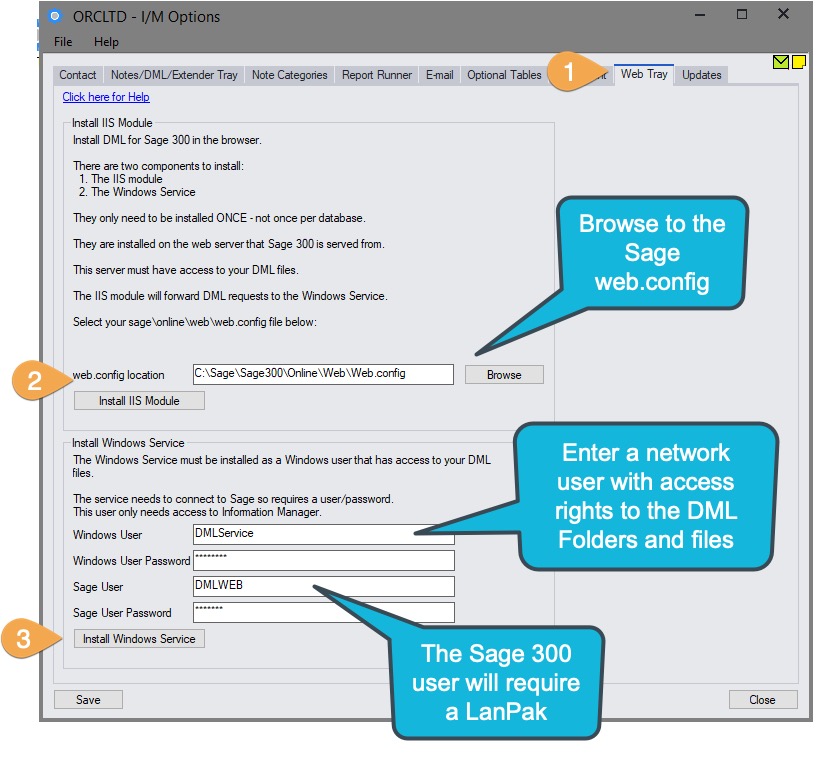
Step 2. Install IIS Module
-
Select the path to the Sage 300 web.config file and choose Install IIS Module (2)
This step updates the web.config file as per below. You can open the file to check if required.
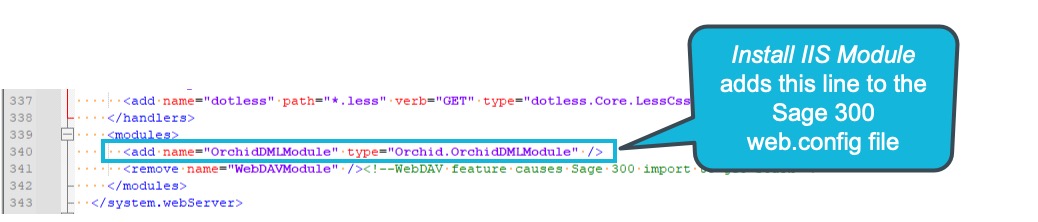
You can check the file or update it manually:
1. Open sage\online\web\web.config in a text editor.
2. Look for the line:
</system.webServer>
3. Add the line below in the modules section:
Note: After installing an update to Sage 300 System Manager, you may need to reinstall the IIS Module.
Step 3. Install the Windows Service
-
Enter the network user details you want to use to run the Orchid InfoManager Web Service.
-
Enter the Sage 300 user details to connect to Sage 300.
For details about security requirements, see Before you configure
-
Install Windows Service .
This adds the Orchid InfoManager Web Service in Windows Services. The user is the Windows User you enter.

Install Orchid Tray web service
1. Open PowerShell as administrator

2. Execute the following commands:

cd \sage\eb71a
New-Service -Name "orchiddml" -DisplayName "Orchid DML" -Description
"Orchid DML Worker Service" -BinaryPathName (Convert-Path -LiteralPath
.\OrchidTrayWebWorker.exe)

3. Open Windows Services.

4. Locate "Orchid DML" in the service list.

5. Right click and select Properties.

6. Select the 'Log On' tab.

7. Change the account to a Windows account that has access to the
required DML network folders.
Updating the Orchid InfoManager Web Service
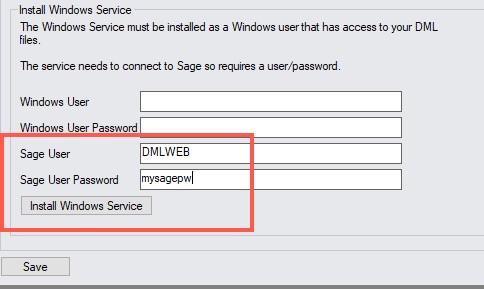
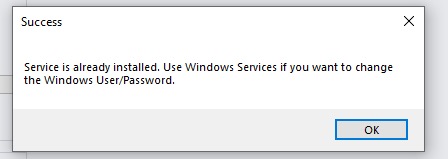
If you have previously installed the Orchid InfoManager Web Service, you can only change the Sage 300 user details in I/M Options. You cannot change the Windows user details.
To change the Sage 300 user details
-
Leave the Windows user details blank
-
Update the and
-
Click Install Windows Service
-
Save - This only saves the Sage User.
Note: Passwords are not saved in the database and not displayed on the screen after saving.
To change the windows user running the service,
-
In Windows Services, change the network user.
-
Select a windows user with rights to run Sage 300 (Read access to the program files and Read/Write access to the Sage 300 Shared Data folder).
-
Restart the service.
If you enter Windows user details and Install Windows Service when the service is already installed, Information Manager displays a message to change details in Windows Services and doesn't do any changes.
Learn More
Configuration Tips for Notes and DML Web Screens