Vendor Alert Manual workflow
Overview
Purchasing team needs the ability to send alerts to Operations team about certain vendors.
In some cases, they just want to send an email notification. In other examples, they would like to track that the operations team has seen the alert on the console.
Sample files
Workflow Export - You can import the files:
For a workflow that sends an alert, updates the workflow history and completes the workflow in one step: AP Vendor manual alert-one step.xlsx
if you need the assigned user to confirm they have seen the notification on the workflow console, use AP Vendor manual workflow.xlsx
Requires Extender PU12.00 or above
Extender Setup key steps
To achieve the requirement, we will create a workflow template that can be manually started and configure an icon on the A/P Vendor screen.
- Add Workflow Users - Understanding Workflow Users
- Create a "Workflow Template" in Extender Setup > Workflow Templates : Vendor manual alert
- Add Information Manager Configuration to start the Extender Workflow.
Workflow template - Step by step guide
Template ID - Enter a descriptive name. The name cannot be updated after it is created - This tutorial refers to a one-step workflow.
Can start manually: set to Yes
Note: You need to configure what screen the workflow can be started on in I/M Options > Notes/DML/Extender Tray setup.
Auto Delete instance when complete: Yes
Can start multiple instances: No with Message- to ensure the first request is completed before a new one starts.
It is recommended to add the main steps as defined on the process flowchart first, and then configure the detailed actions for each step.
For more details. Workflow Templates - Screen Guide
Add 1 step - The detailed actions for each steps will be configured below.
- Send Comment: Entry Step. This steps also completes the workflow.
Note: If you want the assigned user to confirm that they have seen the alert, create another 2 steps, "Wait" and "Complete".
Progress-to steps are used when a user needs to select the next Step to progress the workflow. Progress-to steps add Controls to the workflow console. If workflow screen icons are configured in Information Manager, Progress-to steps can be run from the configured Sage 300 screen.
In this example, if you are doing a 2-step alert workflow, where the user needs to complete the workflow,
- Select the Send Info Step, add the "Complete" step as a Progress-to step.
Values are used in the workflow and saved in the workflow history.
For Vendor Alert manual workflow, the workflow will track the Vendor ID to enable drill down, custom description fields and Approvers.
For each step, the template includes a series of actions to match the process flow requirements. In the A/R customer on hold manual workflow, some of the key actions are described in this tutorial.
For a list of actions included with ExtenderConfigurator, refer to Configurator Actions
AddParameter: Add required fields:
- VENDORDELAY- text(size=100) - User can enter comment
- AssignedUSER - user type - when using the workflow, prompt to select the user to assign the workflow / send the alert to.
AskForParameters: always required after AddParameter to display the popup screen and wait for user to enter Input.
GoToStep: Go back to Wait if the field update has not been successful.
SetValue: {VIEWID} - AP0015 for A/P Vendor This is required for a manual workflow to attach the workflow to a Sage 300 View. View fields are now available in the workflow actions and in message templates.
SetDrilldown: Set the VENDOR value to the current Vendor {VENDORID} to enable drilldown from the console
AssignUser: Choose the {AssignedUSER} parameter name defined above.
- Or you can enter the appropriate user If you want to hardcode the user.
- If you can create a user group called APAPPROVER, you can select that group.
SetStatus: Set the workflow status to "VendorAlert"
SetDescription: This will be displayed on the console. Use {VENDNAME} to show the vendor name.
SendEmail: Choose a template and the email address/user / user group to use -
- In this example, use {CURUSER} to email the user assigned to the workflow.
- Or you can email the workflow user group created APAPPROVER.
Final Action:
- Complete: Set the final action to "Complete" if you want to complete the workflow in one step.
- GoToStep: Choose Wait step if you want the assigned user to confirm they have seen the alert.
Note: If you want the assigned user to confirm that they have seen the alert, create another 2 steps, "Wait" and "Complete".
The Wait steps have no action, as it is waiting for a User to progress the workflow.
Complete Completes the workflow. Will be deleted from the Console if "Auto delete"is set to Yes.
Attach workflow to AP Vendor screen
To start the workflow manually, you don't need to add it to Extender Setup > View Events and Scripts.
Instead, you add the configuration in I/M Options > Notes/DML/Extender Tray setup.
If you want to configure icons on Sage 300 screens to progress the workflow and to view workflow history, you need to configure Information Manager.
-
Install and activate Information Manager for your version of Sage 300.
-
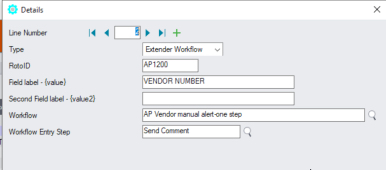
Setup I/M Options for Extender Workflow. For details, Extender Workflow- Notes/DML/Extender Tray
Select RotoID AP1200 for A/P Vendor.
Field Label: Vendor Number.
Using Extender workflow to start the AP Vendor manual workflow
Use Icon on A/P Vendor screen to send an alert
Enter a comment when prompted.
The assigned user receives a notification and can complete the workflow in the console, confirming they have seen the notification.
Viewing workflow history and logs
- When the workflow is complete, you can use Workflow Log to view past instances when the workflow was used to send detailed comment about a customer.
- View Workflow Logs to see history.
This functionality is available in Extender Levels Configurator, Customizer and Developer.
To use the Workflow console, users need to be configured as a Workflow User.
To configure the Tray Icon on the Sage 300 screens, you need to install Information Manager.
To use the icons, you need to configure the user as a Workflow User