Message Template Variables
A variable is a string of characters in an email message or IM Note that is replaced with a specific term or value when the message is sent or the I/M Note is created.
Example: In an email message to the Accounts Receivable manager where a customer’s credit limit has been changed by the Sage 300 user “Anne”, the line "the customer’s credit limit has been changed by {USER}” will be replaced with "the customer’s credit limit has been changed by ANNE" when the message is sent.
Common Message Template Variables
You can use the following common variables in all email messages and I/M Notes
| Value to Insert | E-mail Message Variable |
|---|---|
| The type of event : “Insert”, “Update”, “Delete” | {OP} |
| The user id who triggered the event/Logged on user | {USER} |
|
Sage 300 Database ID |
{ORG} |
| Sage 300 Company Name | {CONAME} |
|
When using the Remote Action Service, user {RUNUSER} as the workflow {USER} is the user who runs the poller script or the user configured in Process Scheduler. Refer to Poller script: how it works |
{RUNSER} |
| The year of the event being triggered | {YYYY} |
| The month of the event being triggered | {MM} |
| The day of the event being triggered | {DD} |
| The hour of the event being triggered |
{12HOUR} or {24HOUR} {HOUR} is equivalent to {24HOUR} |
| The minute of the event being triggered | {MINUTE} |
| The second of the event being triggered | {SECOND} |
| Use 12 hour time format and Select AM/PM |
{12HOUR} to show a 12 hour time format {AM} prints either "AM" or "PM" {am} prints either "am" or "pm" |
| Use 24 hour time format | {24HOUR} |
If the change was done by ANNE by an Update on 21st December 2014, at 14:05:55, the following email or IM Notes template
This change was done as part of an {OP} by {USER}.
The change was done on {MM}/{DD}/{YYYY} at {12HOUR}:{MINUTE}:{SECOND}{AM}
Would result in:
This change was done as part of an update by ANNE.
The change was done on 12/21/2014 at 2:05:55PM
To use 24 hour format,
The change was done on {DD}/{MM}/{YYYY} at {24HOUR}:{MINUTE}:{SECOND}
The change was done on 21/12/2014 at 14:05:55
View Fields for Message Template Variables
You can use any of the View Fields to which the event has been attached in all email messages and I/M Notes created by Extender. To include a field in the subject of the email and/or in the body of the email/IM Note , use the field name in braces/curly brackets “{}”.
Furthermore, to include both the before the event and after the event field values, you can prefix the field name with “ORIGINAL_”
Note: To use the original values in a message template used in the workflow, you need to set some variables in the workflow values panel (on the bottom right hand-side in the workflow template setup).
Example: When using the AR Customer view (AR0024 / ARCUS), you can use this to include the Customer Code and Customer Name values, as well as the Before and After value for the Credit Limit.
Customer {IDCUST} {NAMECUST} credit limit has changed from {ORIGINAL_AMTCRLIMT:%d2.2} to {AMTCRLIMT:%d2.2}
Tip: To see the available View Fields for any view, use Extender View Info to see a list of available views per module, and fields per view.
You can control the text and number formatting in Message Templates used to create I/M Notes.
Number of decimal places for Number values:
| Variable | Comment | Example |
| {FIELD:d2} | number with commas, specify number of decimal places after d | {AMTCRLIMT:d2} = 24,000.00 |
| {FIELD:D0} | number without commas, specify number of decimal places after D | {AMTCRLIMT:D0} = 24000 |
| Variable | Comment | Example |
| {FIELD:%C} | Converts the text to Uppercase | {NAMECUST:%C} = MR RONALD BLACK |
| Value to Insert | E-mail Message Variable |
|---|---|
| Customer ID | {IDCUST} |
| Customer Name | {NAMECUST} |
| Credit Limit – new value | {AMTCRLIMT:D2} |
| Credit Limit – original value before the change | {ORIGINAL_AMTCRLIMT:D2} |
For example, if the change was done on customer 1200 Ronald Black by amending the credit limit from 19,000 to 20,000 by ANNE, the following :
The credit limit for Customer {IDCUST} {NAMECUST} has changed from {ORIGINAL_AMTCRLIMT} to {AMTCRLIMT}.
Would result in:
The credit limit for Customer 1200 Ronald Black has changed from 19000 to 20000.
Workflow fields available in Message templates
When using a Workflow. SendEmail action, values from the workflow instance are available to use.
Some values are populated when using SetValue in the workflow templates. Some values are updated automatically by the workflow, when the workflow steps are invoked.
The following values are available to use in action parameters and email templates used in the Workflow.SendEmail action:
{$1}, {$2}, {$3}, {$4} - step parameters
{PROGRAM} ID of calling program (e.g. OE1100 = Order Entry)
{ROTOID} ID of the calling view (e.g. AR0024 = AR Customers)
{USER} current user (e.g. ADMIN)
{field} gets a value either from the workflow instance values, or from the target view.
{VIEW.field} gets a value from the target view
{VALUE.name} gets a workflow instance value
{VIEWID} the view ID for this workflow instance
{VIEWKEY} the record key for this workflow instance
{KEYDESC} the description for this workflow instance
{TOVALUE} the requested value for this workflow instance
{STATUS} the current status for this workflow instance
{COLOR} the colour for this workflow instance
{CURUSER} the user or group currently assigned for this workflow instance
{WTNAME} the workflow template name for this workflow instance
{STUSER} the user who started this workflow instance
{STEPNAME} the current step for this workflow instance
{PSTEPNAME} the previous step for this workflow instance
Formatting numbers:
Append ':{required decimals}' to the field
E.G. {ORDTOTAL:2}
All view fields for the views attached to the workflow -
View fields can be made available in the workflow templates in 2 ways:
2. Use the SetValue action, Field= {VIEWID} and Value= AR0024 (use Extender View Info to get the View ID that you require)
All values configured in the workflow template.
Values can be added to the Values section of Workflow template if you need to set a default value.
Values can also be set in any action, using SetValue The value is then stored with each instance of the workflow, for each step.
Use {VALUENAME} in the Message template to include the workflow instance value.
To use Original and new values in a message template used in the workflow:
To use the original values, you need to set some variables in the workflow values panel to store the original value(on the bottom right hand-side).
Test example with EFT Vendor EL0006
1. Create a value in the values panel. I used ORIGINALEMAILTO set it to {ORIGINAL_EMAILTO}. This saves the original value before the first step of the workflow starts.
2. Optionally, if you need to use it in the workflow, you can use the value in the Values panel.
3. In Email templates, you can use both values, the one in the Values panel and the one in the workflow action
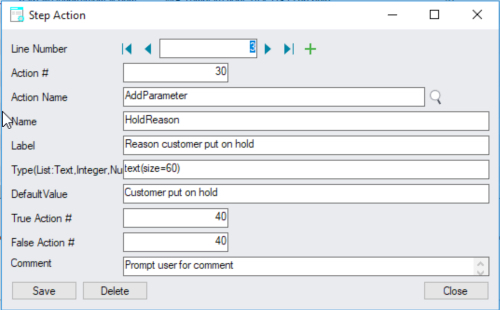
Workflow Parameters
If you use the AddParameter and AskForParameters actions in a workflow templates, users will be prompted for input before the next action takes place.
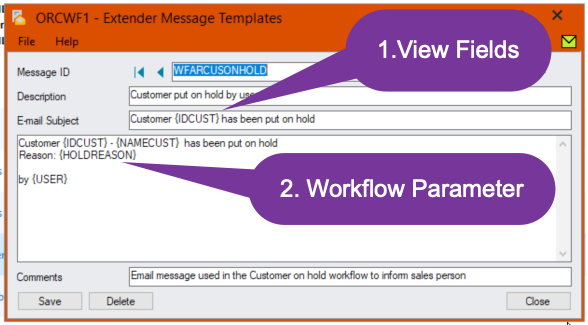
You can use {PARAMETERNAME} in the email template.
Action = AddParameter, Name= HoldReason, Label = Reason customer put on hold, Type = text(size=60), followed by AskForParameters action.
Remote Action
Include {FORMURL} in the Email template to include the unique link to the Remote Action form to progress the workflow.