Tutorial - Setup Extender to Log the creation of an O/E Invoice
A company wants to log the date and time when an invoice is created in O/E Order Entry. Because the Audit date reflects the last time the transaction was updated, and it can be overwritten during the Day End processes, the company is using Orchid Extender to log the O/E Invoice creation.
The same approach can be applied to any key field that cannot be changed.
Extender Setup
Requirement! This functionality is available in Extender Levels Configurator, Customizer and Developer.
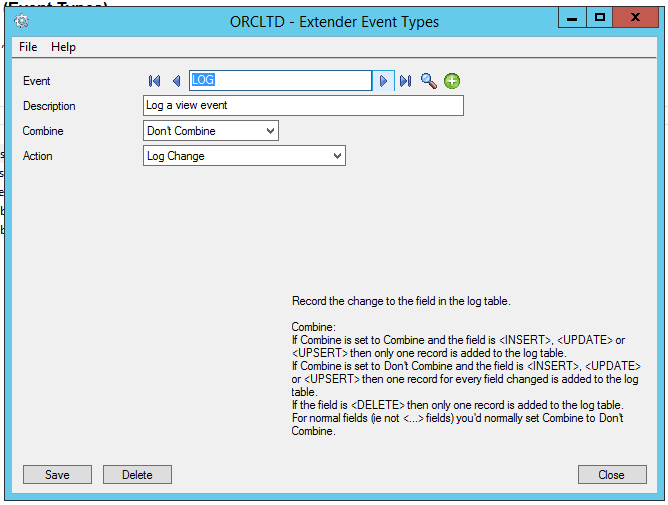
Step 1: Create a "LOG" Event Type in Extender Setup / Event Types
Choose "Log Change" as the Action.
Choose "Don't Combine" so that the original and new values are logged.

Save the Event Type.
Step 2: Attach the LOG Event to the O/E Invoice view
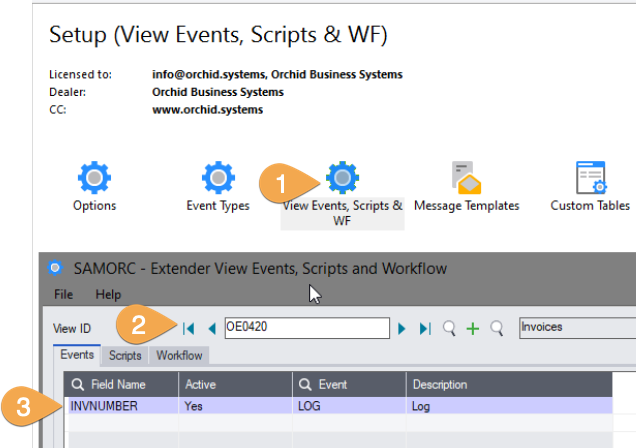
Use Extender Setup / View Events and Scripts.
Enter OE0420 as the View ID for O/E Invoice.
Select INVNUMBER as the Field Name and choose LOGas the Event Code.

If you have already configured Extender for the O/E Invoice View, a list of events configured will be displayed.
If you don't know the View ID, you can click F6 or the "All Views Info" icon  to display a list of all Extender Views active in the database.
You can use Extender / Inquiries / View Info to view additional details on the Extender Views.
Step 3: Save the View Event.
Restart the Sage desktop.
If you add a LOG event to the {INSERT} field, all fields will be logged.
If you add a LOGCOMBINE event to the {INSERT} field, you only see the INVUNIQ field in the Extender Log screen, and not the visible Invoice Number.
Viewing Log Details
Create an O/E Invoice from the O/E Order Entry, O/E Shipment or O/E Invoice Screen (or through a third party application that uses the Sage 300 SDK)
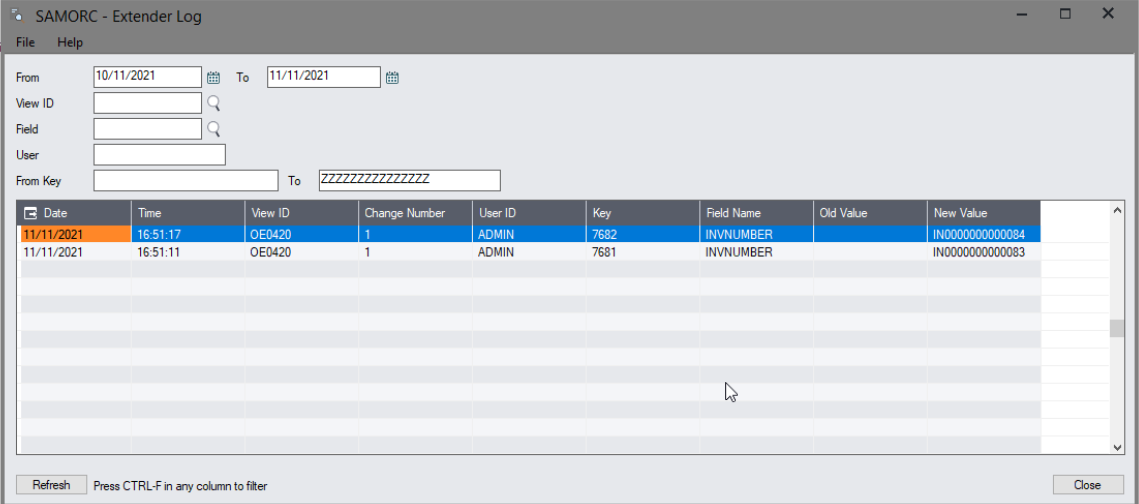
Extender Inquiries > Log
The Extender log in Extender Inquiries > Log show the Date, Time and Sage 300 user who created the Invoice.

Use [] in any of the columns to filter the log contents by the selected column.
The current filter is shown along the bottom of the screen, and is saved per user per screen.
Tip: You can apply a filter on multiple columns by first clicking [Ctrl] on the first column required and applying the filter, and then by clicking [Ctrl] on the second column required and applying the filter.
Tip: If the filter is not cleared prior to closing the screen, it will be remembered and re-applied the next time the same user opens the same screen.
