Adding Security
Assigning EFT Processing security
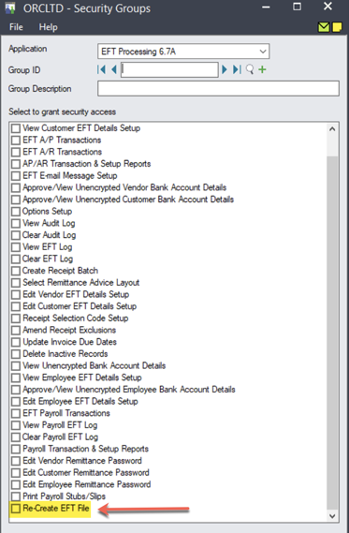
Using the Security Groups form in the Administrative Services folder, you can assign the following security tasks to EFT Processing. You can then assign Sage 300 users to the appropriate Security Groups. Details below apply to EFT Processing (A/P and A/R) and EFT Processing (Payroll).
Bank EFT Setup – add/modify/delete EFT Bank details
View Vendor EFT Details Setup – only view the EFT Vendor’s setup
View Customer EFT Details Setup – only view the EFT Customer’s details
EFT A/P transactions – create EFT Files for AP Payment batches
EFT A/R transactions – create EFT Files for AR Receipt batches
Transaction & Setup Reports – can run EFT Transaction and Setup Reports. We don't have different security groups for each report group.
If you want to prevent certain users from running some reports, they can create a UI Profile and apply it to the user.
E.g. Create a UI Profile and hide the Print Button or any other look-up field that they don't want the user to see and apply it to the user.
User still sees the icon, but they cannot run the report.
EFT E-Mail Message Setup – can maintain EFT Email Message Templates
Approve/View Unencrypted Vendor Bank Details - set a Vendor's Bank details to Active/Inactive and view unencrypted Vendors bank account details. Can only update the Active field, cannot update other Vendor bank details.
Approve Customer/View Unencrypted Bank Details - set a Customer's Bank details to Active/Inactive and view unencrypted Customers bank account details. Can only update the Active field, cannot update other Customer bank details.
Options – add/modify EFT Options
View Audit Log – can view the audit log of changes to EFT Vendors & Customers details
Clear Audit Log – can view and clear the audit log of changes to EFT Vendors & Customers details
View EFT Log – can view the audit log of EFT Files created
Clear EFT Log – can view and clear the audit log of EFT Files created
Create Receipt Batch – can run EFT Create Receipt/Refund Batch
Select Remittance Advice Layout – can choose a different EFT Remittance advice at the time of running
Edit Vendor EFT Details Setup – add/modify/delete EFT Vendor setup details.
Edit Customer EFT Details Setup – Add/modify/view EFT Customer setup details.
Receipt Selection Code Setup – can create and amend Receipt/Refund Selection Codes
Amend Receipt Exclusions – can amend Create Receipt Batch Customer/Document exclusion list
Update Invoice Due Dates – can update Invoice Due Dates
Delete Inactive Records – can run Period End Processing – purge inactive EFT Vendor and EFT Customer records
View Unencrypted Bank Account Details – view EFT Banks unencrypted bank account details
Edit Vendor Remittance Password - can view& edit unencrypted vendor remittance password
Edit Customer Remittance Password - can view& edit unencrypted customer remittance password
EFT Payroll Security Groups
If you have an activation code for EFT Processing (Payroll), you can also select:
View Employee EFT Details Setup - only view the EFT Employees’s setup
Approve/View Unencrypted Employee Bank Account Details - set Employee's Bank details to Active/Inactive and view unencrypted Employees bank account details. Can only update the Active field, cannot update other Employee details.
Edit Employee EFT Details Setup - add/modify/delete EFT Employee setup details.
EFT Payroll Transactions - Create EFT Files for Payroll entries.
View Payroll EFT Log – can view the audit log of Payroll EFT Files created
Clear Payroll EFT Log – can view and clear the audit log of Payroll EFT Files created
Payroll Transaction & Setup Reports - can run Payroll reports
Edit Employee Remittance Password - can view& edit unencrypted employee remittance password
Print/Email Payroll Stubs/slips - Security group required to be able to Print/Email paystubs/payslips in EFT Payroll.
Tip: If you want a user to View unencrypted details and be able to Edit details, you need to select both Approve/View Unencrypted Vendor Bank Details" and "Edit Vendor EFT details Setup". Same with Customer and Employee Bank Details.
EFT Payroll does not support CP/UP "Selection List" employee level security. Create EFT File, Print EFT Remittance Advice and the EFT Payroll Log show all employees net pay details.
Select this option for users who can recreate an EFT File for a batch that has already been exported.
Tip: Only add a few users to a security group that can recreate files.
For information on activating security and setting up security groups, refer to the System Manager online Help (choose the Help menu on the Sage 300 desktop)
If you want users to be able to change the print destination, permission to Change Print Destination must be assigned from the Administrative Services permissions list in the Security Groups form.
Steps for Setting Up EFT Processing