Generate Credit Notes
How to use
You need to select the Complete option in the header to complete an RMA before you can create associated documents. To create O/E Credit Notes, use the Generate C/N button.
Credit notes. If the option to match credit notes to invoices is selected, the program generates as many credit notes as there are invoices on the RMA detail lines. The credit note(s) will be generated and matched to the associated invoice.
If you do not use the option to match credit notes to invoices, only one credit note is created. See Using RMA templates section below.
: The last credit note’s generated details are stored on the RMA header.
Once the credit note has been generated, the credit note date and number are stored with the detail for later reference. Using F9 Zoom, you can use the Integration Tab to view and print the documents.
Using RMA templates to create Credit Notes.
The RMA Template used when creating the RMA determines whether or not a credit note is applied to an invoice.
-
If you do not want matched Credit Notes, then de-select "Match Credit Note to Invoice" on the associated RMA Template code.
-
If you want Credit Notes to be matched to the associated Invoice, then you need to select both "Match Credit Note to Invoice" and "Invoice is required on all items" for the associated RMA Template Code.
-
If you want only some Credit Notes to be matched and others not, you would need to create two RMA Template Codes and use the appropriate one on each of the documents.
You can specify default values for RMA template codes so that a template is automatically selected when creating an RMA transaction.
-
A default Template Code, using RMA Setup -> RMA Options, and;
-
A default Template Code per Customer, using the RMA Setup -> Customer Templates option
The following settings on the RMA template > Processing Tab affect the credit note creation:
-
Match Credit Note to Invoice
-
Invoice Required on all Items
-
Default Original Invoice Quantity
-
Check Quantity Already Credited
Document Checks: Match Credit Note to Invoice
This option instructs RMA to create O/E Credit Notes that are matched to O/E Invoices.
When RMA processes a document’s details to determine what lines need to be credited, it checks to see whether a detail line was sourced from an O/E sales invoice. It groups lines with invoices by invoices, and separates them from lines that were not sourced from an invoice, using the groupings to create multiple credit notes.
When this option is turned off, RMA will create unmatched O/E credit notes regardless of whether the RMA document detail lines were source from an O/E invoice.
Document Checks: Invoice Required on all Items
This option enforces that all lines – except Miscellaneous Charge lines – are sourced from an O/E sales invoice. Item lines on an RMA document that do not come from an O/E invoice are rejected.
This option is used in combination with Match Credit Note to Invoice.
Note: turning this option off does not prevent RMA document details to be sourced from an O/E invoice. Instead, it allows the RMA document to contain a combination of lines with or without a source O/E invoice.
Document Checks: Default Original Invoice Quantity
When selected, an RMA detail line that is sourced from an O/E sales invoice will take the quantity invoiced and apply it to the RMA quantity. This setting only affects lines that come from an O/E sales invoice.
Check quantity already credited
Before creating the credit note, RMA will check how many other credit notes have been applied to the Invoice/Item combination. If the quantity already credited exceeds the quantity on the Invoice - RMA will not allow you to create another credit note.
Overriding the rules
The template validation rules can be overridden - on a RMA by RMA basis - by a user set up in RMA Setup -> Authorizations who is "Authorized to approve RMAs". Once a user with this privilege "Approves" on the RMA header and keys in their user id and password, the validations will not be applied to this RMA only.
In creating the O/E Credit Notes, RMA groups its details into two groups: those that came from an invoice, and those that did not.
The lines that come from an invoice are placed in a credit note matched back to the invoice.
If you select "" , you will end up with one credit note per Original Invoice Number on the RMA - e.g. you might have 5 lines, lines 1-3 are associated with INV123 and lines 4-5 are associated with INVXYZ. You would end up with 2 credit notes, one applied to INV123 with 3 lines, and one applied to INVXYZ with 2 lines.
The lines that do not come from an invoice are placed in an unmatched credit note i.e. it was not applied to an O/E Invoice. This is only possible if the template does not select .
Using Templates for Credit Note field mappings
OE Credit Notes are posted immediately - there is no 'Save' - hence there is no way we can create a Credit Note and leave it unposted. You can use the RMA templates to set default values and validations to meet your business processes.
When creating a credit note from an RMA, the header fields on the Credit Note are set in different ways, depending on whether or not the Credit Note is being applied to O/E Invoices and whether you are using RMA templates.
RMA Number
RMA populates the O/E Credit Note REFERENCE field with the RMA number.
If an RMA template is used, the template can dictate whether the RMA number goes into the OE REFERENCE or the DESC field.
Ship Via
Ship via value that gets sent to the credit note always comes from the RMA header.
It goes into the OECRDH.viadesc field.
Unmatched credit notes:
RMA uses the ship-to information on the RMA header.
That ship-to info comes from A/R, the same as it does for O/E documents.
If there is no ship-to, then the shipping addresses come from the RMA header billing address, which comes from the customer.
Fields like territory, customer account set, terms code, ship-to (default), tax group, and customer discount always come from the A/R customer record.
For matched credit notes:
Many fields' default values come from the O/E invoice courtesy of the defaulting that O/E does, for example the Tax Class.
Billing and shipping addresses come from RMA as well.
RMA overwrites the values defaulted from O/E with RMA's values in the header if defined in the template.
Tax class example:
If the credit note is not matched to an invoice, the Item defaults will be used.
If you need to use a tax class on the item other than the default tax class (the tax class was overridden on the OE Invoice), you need to work with RMA Templates, and select 'Match Credit Note to Invoice' and 'Invoice required on all items' on the associated RMA Template \ RMA Processing tab.
When you click 'Create Credit Note', the price/cost/tax will then come from the posted Invoice, not from the current Item / Customer defaults.
Templates Values
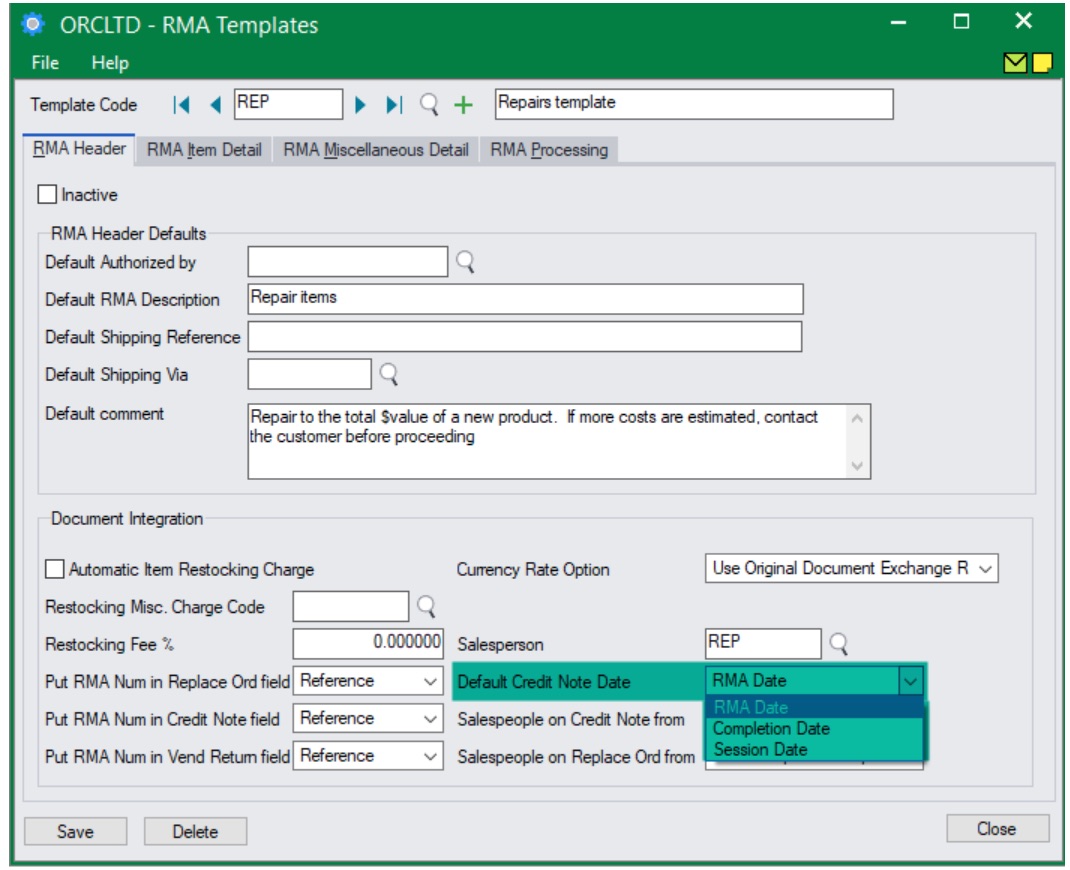
In all cases, the credit note date, salespeople, comment, is set according to the template defaults.
Credit Note Date :
On the RMA Template > Header tab, you can set the Credit Note date:
Use RMA Date, Completion Date or Session Date
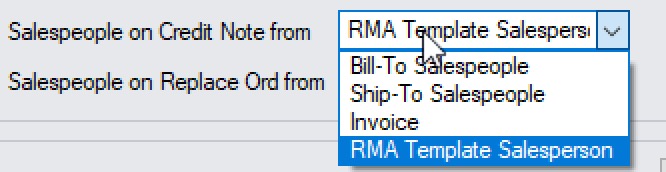
You can select options on the RMA Template > RMA Header Tab.
-
RMA Template Salesperson: Uses the Salesperson on the RMA Template.
-
Bill-To Salespeople: from the AR Customer
-
Ship-To Salespeople: from the AR Customer Ship -To details
-
Invoice: uses salespeople on the matched invoice.
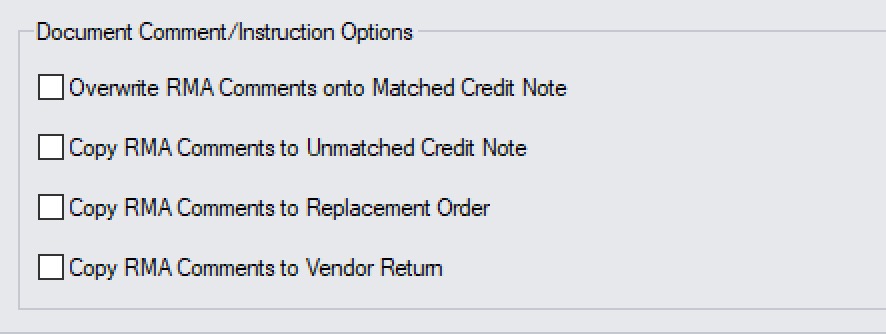
On the RMA Templates > Processing Tab, select Overwrite RMA comments onto Matched Credit Note or Copy RMA Comments to Unmatched credit note to copy the RMA detailed comments and instructions to the Line credit note.
It not selected, no comments will be copied from the RMA to the Credit Note.
Troubleshooting Create Credit Note
When trying to generate a Credit Note in RMA, you get a "no Credit Note generated" message.
The most likely reasons are:
-
There is no Quantity, AND;
-
The RMA detail line has not been flagged as
-
The line has already been credited. Any given line can be used on only one credit note.
-
If the template validates , the line on the original invoice may already have been credited.
If a detail does not use the option Put On Credit Note, it is not included on the credit note. To change this option later:
-
Clear the Complete option for the RMA header
-
Amend the detail line, and
-
Select Complete again for the header,
-
Click Generate CN again to produce an additional credit note.