F/S Setup>F/S Options
General Tab
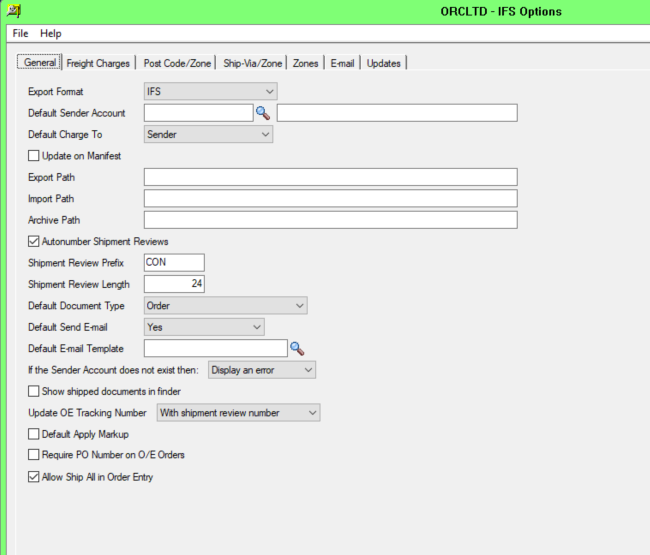
On the General tab, fill in the configuration options for the Freight SmartLink.
Select SmartFreight for SmartFreight integration / XML Files, SupplyMaster for SupplyMaster (CSV) integration.
Select the Default Sender Account to be included in the shipment review integration file. This account may be overwritten on a shipment review by shipment review basis.
Select Sender if (by default) the Sender Account number is to be used on the shipment review documents.
Select Receiver if the Receiver’s Account number is to be used on the shipment Review documents. If Receiver is selected, then the following optional fields need to be set up on the customer and/or customer ship-to and on the O/E Transactions:
- Have an optional field call IFSLINK on either the customer or customer ship-to location. The first character should be 'R' for receiver, or 'S' for sender.
- If it is 'R' then there are 3 other optional fields you can (but don't have to) use. They can be set on the customer or customer ship-to location. They are:
- IFSACCNO - used as the sender account number on the shipment review
- IFSCARRIER - used as the default carrier on the shipment review
- IFSSERVICE - used as the default service on the shipment review (only if IFSCARRIER is specified)
- Set each IFSACCNO up in the F/S Setup>“Sender Accounts” screen
- Select the option “Receiver” in F/S Setup\Options\”Default Charge To”
The rules for the exporting of the “account id” in the XML file for Freight SmartLink is based on the following :
- If the “Default Charge To” on F/S options is Sender then we use location/carrier account number (FFLOCCAR.ACCOUNT) if it exists, otherwise we use the carrier account number (FFCARH.ACCOUNT).
- If the “Default Charge To” on F/S Options is Receiver then we use the Sender Account field from the header of the shipment review. This can default from the customer/customer ship-to if the optional fields (IFSLINK, IFSACCNO) have been set up for the customer/customer ship-to. If no optional fields are set on the customer, then the Sender Account will default to the Sender Account set up on the F/S Options.
Select this option if you want to import the consignment note numbers and associated freight costs generated by the Freight Carrier when you run the Periodic Processing > Import Manifest function.
Deselect this option if the consignment note number is to be read back from the Freight Carrier when the Freight Carrier shipment review file is created and exported.
Export Path: Specify the network folder where the Freight Carrier files are to be created
Import Path:Specify the network folder where the Consignment details are to be read from
Archive Path: Specify the network folder where the consignment details are to be archived once read
Auto number Shipment Review: Select to Auto number Shipment Review documents
Shipment Review Prefix: If auto numbering, define the Shipment Review prefix
Shipment Preview Length: If auto numbering, define the maximum length for the shipment review number. This length is inclusive of the shipment review prefix
Order/Shipment/Invoice. Select the default document type from which the shipment reviews are to be created
Yes/No Select “Yes” to send the customer (email address on the OE Order) an email notification when the consignment note number generated by the freight carrier has been imported back onto the shipment review and the consignment has been dispatched.
Default Email Template: If emails are automatically sent to customers when updating the consignment note number for the shipment review, select the Email Template to be used.
Display an error/Display a warning/Do Nothing validation done when the Shipment Review integration file is created.
When the option is selected, the finders on the Shipment Review screen include all Orders/Shipments/Invoices.
When the option is NOT selected, the finders only show Orders/Shipments/Invoices where the "Tracking Number" is blank.
Don’t update/With Shipment Review Number/With Consignment note number. When the consignment note number and freight costs are imported back onto the Shipment Review, you can optionally configure Freight SmartLink to update the associated OE Tracking number with the Shipment Review Number or the Consignment Note Number.
Select this option if you want to use the Freight SmartLink feature of basing the freight cost to the carriers cost plus a mark up.
Select this option if you want to validate the P/O Number field is mandatory in O/E Orders.
Select this option if you want to allow shipments to be created from the O/E Order entry screen,
if you want to ensure Shipments are only created using the O/E Shipment Screen, do not select the option.
Freight charges tab
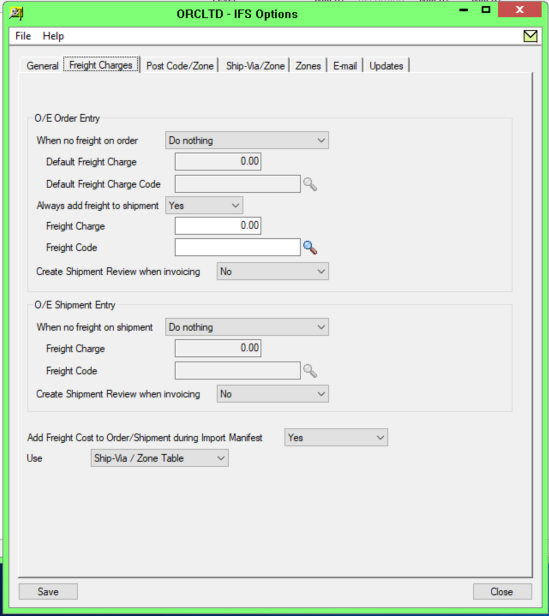
Use this Tab to configure whether to Add freight automatically, validate that Freight is added, Create shipment and Export to the Freight Carrier automatically when invoicing OE Orders and OE Shipments
To add freight or to create Shipment Reviews automatically, you need to use the F/S Order Entry or F/S Shipment Entry screen to create the invoice.
O/E Order Entry Settings
When no freight on order: Do Nothing/Warn/Error/Add Freight
Default Freight Charge: Define the Default Freight charge when auto-adding Freight
Default Freight Charge Code: select the default Non-Stock item code to be used for auto-added freight charges to the OE Order
Always add freight to shipment: Yes/No. When creating shipments from the OE Order Entry Screen, you can define an automatic Freight Charge to be added
Freight Charge : Define the Default Freight charge when auto-adding Freight to a shipment created from the OE Order Entry Screen
Freight Code: select the default Non-Stock item code to be used for auto-added freight charges to the OE Shipment
Create shipment Review when invoicing: No/Create/Create and Export. If you are creating the OE Invoice from the OE Order Screen, you can select to automatically create the Shipment Review and/or Create the Shipment Review and export for the Freight Carrier.
O/E Shipment Entry Settings
When no freight on shipment: Do Nothing/Warn/Error/Add Freight
Freight Charge: Define the Freight Charge to be added when auto-adding Freight to a shipment
Freight Code: select the default Non-Stock item code to be used for freight when auto-adding Freight to a shipment created from the OE Shipment Entry screen
Create shipment Review when invoicing: No/Create/Create and Export. . If you are creating the OE Invoice from the OE Shipment Screen, you can select to automatically create the Shipment Review and/or Create the Shipment Review and export for the Freight Carrier
Add Freight Cost to Order/Shipment during Import Manifest: Yes/No. If selected then when the consignment note number and freight cost is imported onto the Shipment Review, the cost of the Non-Stock item for Freight on the associated OE Order or OE Shipment will be updated.
Note: If you create the shipment review automatically when invoicing, the Cost associated with the freight line will not be updated on the invoiced line.
Use: Ship-via/Zone Table or Post Code/Zone Table. When adding freight automatically to OE Orders or OE Shipments, select if the Ship-Via code or Post Code is to be the link to the Zone.
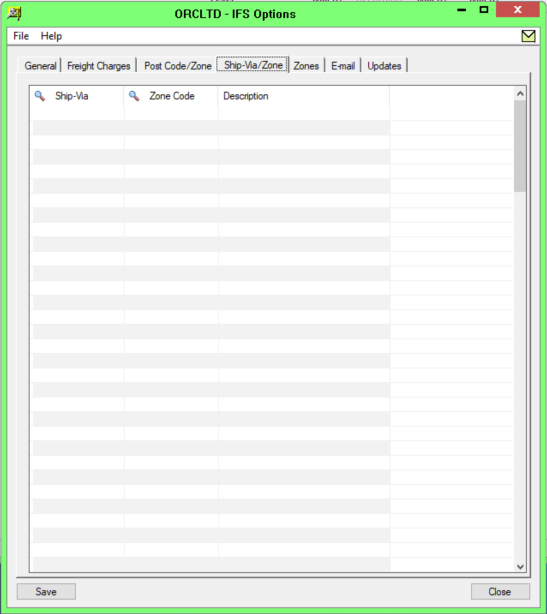
If Ship-via is selected, use the Ship-via/Zone to link Ship via codes to Zones.
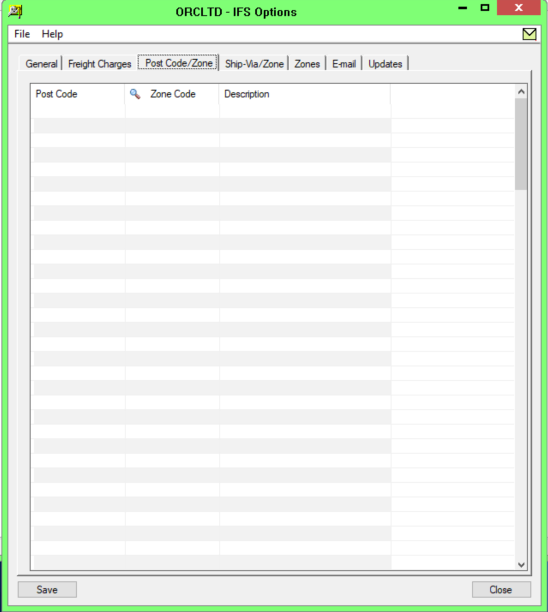
If Post code is selected, Use the Post Code/Zone Tab to link the post codes to Zones.
Post Code / Zone tab
Use this tab to configure the post codes and zones used to calculate freight.
Ship-Via / Zone Tab
Use this Tab to link Ship Via and Zone codes - used in freight calculations.
Zone Tab
Use this tab to define the rules for calculating freight for each zone.
Zone Code: Enter a code
Description: Enter the Zone description.
Max Order Value: Enter the maximum order value if required. If the order exceeds this value, freight will not be added.
Handling Charge: Enter the Handling Charge to be added to the calculated freight charge
Charge Type: Flat/Weight Select Flat for a flat charge Select Weight if the freight charge is to be calculated based on the weight of the order.
Flat Charge: If freight is calculated on a flat charge type, enter the flat charge
Charge/Kilo: If freight is calculated based on the order weight, enter the rate per kilo
Max Charge/Kilo: if there is a maximum freight charge when calculating freight based on the order weight, enter the maximum freight charge. If the order weight exceeds this value, freight will NOT be added.
Minimum Weight: if there is a minimum weight for orders to be used as the basis of calculating freight, then enter the minimum weight. If the order weight is less than the minimum weight, freight will be calculated on the minimum weight.
Item Number : Select or enter the non-stock item number to be used for this zone’s freight charge.
Round to nearest: if calculating freight based on the order weight, you can define rounding rules. 0.01 will round to the nearest cent. 0.10 will round to the nearest 10 cents. 1.00 will round to the nearest dollar.
Zone tab
Updates Tab
Users can now "subscribe" to notifications of updates.
By Default, this option is not selected for end-user serial numbers
The check is stored in the registry and it applies to this Windows user on this computer.
If selected, when starting Sage it will check if there are product updates available for Freight SmartLink
If there is a new update, and the user hasn't previously been notified of it, then the Options screen will open automatically on the Updates tab and display details of the new updates.
You can use "Check for Updates" button to view the list of new features and fixes.
To facilitate support, please include the Version and Product Updates you are running when reporting any issues.
Updates are available to be downloaded from the partner area of the Orchid website Product downloads.


