Custom Tables
Tip: If you create a table and subsequently add a new field, the new field will be added to the dictionary and the existing data preserved.
Enter a unique Table name and table description.
Extender will give a unique View ID to the table.
All custom tables require at least one key.
If using a Module, ensure that the table name is entered as [MODULEID].TableName. Extender will save the Database Table Name with the names to the right of the "full stop".
In an Extender Python script, you can refer to the table by the Database Table Name or the View ID.
Import/Export
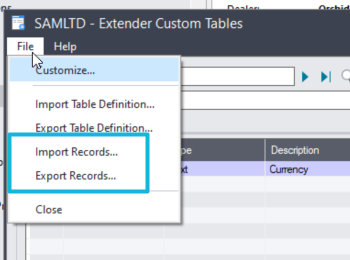
Use the File menu to Export / Import the Table definition.
You can also export records from and import records into the custom table.

Use the Custom Table Editor to enter a few records, then export Records from the File menu. Add and Update data in the spreadsheet. Use File > Import Records to import into the custom table.
Custom Tables Field list
Enter the field name.
Select the field type. One of Text, Date, Time, Number, Integer (16 bit), Integer (32 bit), Boolean.
To mask the value of a TEXT field in the custom table editor, set the List Values to "PASSWORD"
Enter the custom table description. This is used in the Custom Table Editor to select which table to maintain.
It is also used when exporting and importing records in the custom table.
Enter the size (length) of the field. Required for Text and Number fields only.
Enter the number of decimals required. Required for Number only.
If you want to automatically apply a mask to the field, enter the mask required.
%-12C means 12 characters, capitalised, left aligned
%12C means 12 characters, capitalised, right aligned (field will start with spaces).
Refer to the Sage 300 SDK guide for guidelines on entering the mask.
If you require the Custom Table Screen painter to add a finder to a field, then enter or select the View id for the finder. For example, if you want a finder on the AR Customer view, enter AR0024
Select or type the field which will be returned from the finder once a record is selected. This applies to fields setup with a Finder table.
For example, if you want a finder on the AR Customer view and when selected, the AR Customer ID is returned, enter {IDCUST} in the Finder Field
Type a filter string if you want the custom table editor to restrict the records shown in the finder. This applies to fields setup with a Finder table.
IDGRP="RTL" - This will show only customers where the Customer Group is "RTL".
IDCUST="{FIELDNAME}", where FIELDNAME is the field you want to filter by. FIELDNAME is another field on the custom table.
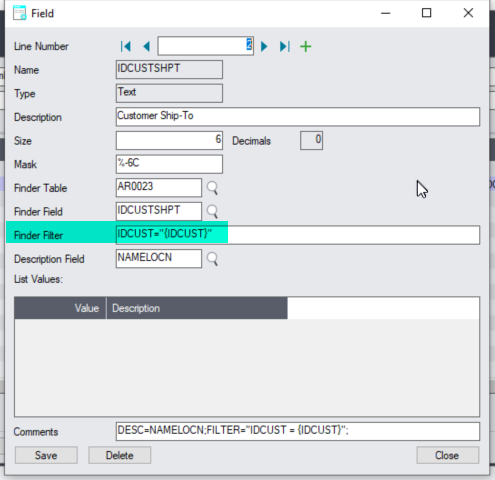
If you have a custom table with 3 fields IDCUST and IDCUSTSHPT. IDCUST has a finder on the AR0024 ARCUS table and IDCUSTSHPT has a finder on the AR0023 / AR Ship To table. You might want to filter the Ship-To Finder by the customer selected in the IDCUST fields.
You would configure the IDCUSTSHPT field as per the screenshot below

Select / Enter the field which will be displayed next to the Finder Field once a record is selected. This applies to fields setup with a Finder table.
For example, if you want a finder on the AR Customer view, and you want to display the customer name next to the Customer ID, Select NAMECUST as the description field.
If you require the Custom Table Screen Painter to build a drop down list box for a field, then enter the list of required drop down field values and descriptions separated by semi-colons(;) .
Important! The field value has to be an integer (16 bit) or Integer (32 bit) for this to be available.
The structure of the field value should be 1=abcd, where
1 is the field value and Abcd is the displayed drop down value
Use ; (semi-colon) to separate list values. Required for all list values except the last one
On the F9 Zoom / Details View, you can add/update the list of values. Insert a new row to add a new value.
Example, the Drop down
Active
Inactive
Would be entered as 2=Pending;1=Active;0=Inactive
Custom Tables Keys Field List
Enter the key number
Enter the key name
Select one of “Allowed” or “Not Allowed” depending if duplicate key values are allowed or not.
Select up to 10 fields from the table to be included in the key.
Table design consideration
Rule 1: The primary key of your custom table must start with the first field in your custom table. That is the convention and design that Sage views/tables follow.
Rule 2: If the primary key includes multiple fields, the fields must be consecutive in the Table setup.
Rule 3: If you have only one key in the table, the key can be Duplicates Allowed or Duplicates Are Not Allowed.
If you have more than one key in the table, the primary key must be "Duplicates Are Not Allowed" and must start with the first field in your table. Your secondary, third, or fourth keys do not have to start with the first field, and they can be both Duplicates Allowed or Duplicates Not Allowed.

