Setup SFTP Output Destination
Why use SFTP?
EFT Processing provides a solid process to automate the payment process. Using SFTP (Secure File Transfer Protocol) offers additional advantages when it comes to EFT (Electronic Funds Transfer) Processing. SFTP is a secure and encrypted protocol that ensures the confidentiality and integrity of data during file transfers.
Many EFT Processing users configure an SFTP Server to save the file before uploading it to the banking software. Some banks provide access to an SFTP server to upload the files. You can discuss this option with your bank.
Overview Video
The EFT Quick Tip video demonstrates using SFTP destination with Orchid EFT Processing for Sage 300.
How does it work?
With EFT Processing for Sage 300, you can automate the SFTP Transfer of the file by configuring the connection details in EFT Bank. The other steps to configure and use EFT Processing are the same for all output destinations.
When you create an EFT File, the file is automatically uploaded to the FTP Site.
EFT Processing supports SFTP with Key file and SFTP with Username and password. You can use both if your bank's FTP uses 2 factor authentication.
When using an internal FTP, many companies enforce separation of duties to further enhance security. A common scenario can be as follows:
-
User 1 creates the EFT File. User 1 does not have access to the SFTP Site
-
User 2 does not have access to create the EFT File, but does have access to the SFTP Site to upload the file to the Bank
-
User 3 has to approve the file in the Banking Software. User 3 does not have access to create the EFT File or to the SFTP Site.
To setup SFTP as an output destination:
Go to EFT Setup > Banks
Set the and enter the required details as described below:
SFTP 2FA with Key File and User Name / Password: if your bank uses 2 factor authentication and requires both a username and password and a key file.
Note: This applies to the Payments and Refunds, Receipts and Payroll options. Refer to Output Destination: in the EFT Bank setup topic.
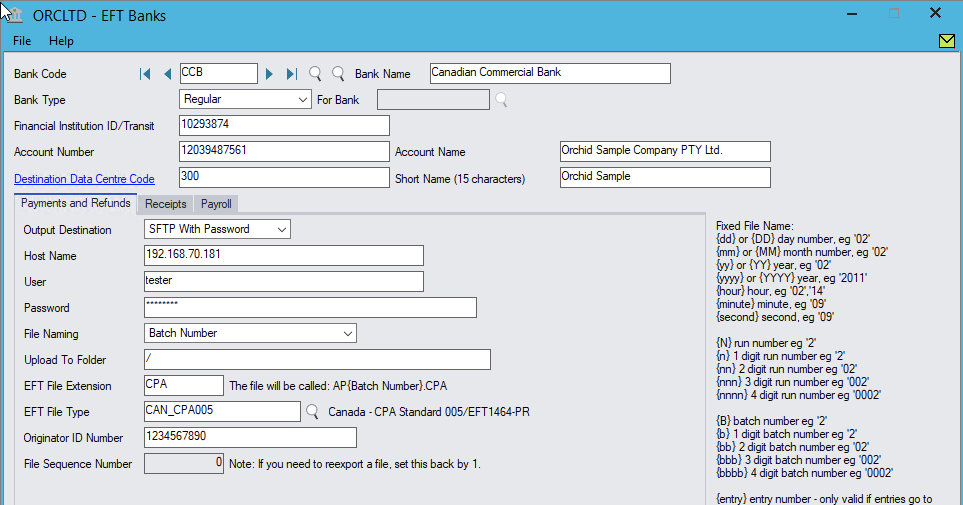
SFTP with Password:
: "SFTP With Password"
: IP Address or name of the FTP Server
Tip: If you are not using the default SFTP Port 22, you can add the port at the end of the hostname, separated by : (semi-colon), for example 123.123.70.70:2222
: User Name
: Password
Tip: To upload through EFT, do not use characters such as: ? = * in the password.
: "/" if you are uploading to the root directory, or "/xxx" if uploading to a folder on the FTP server.
Example: enter "/EFTFiles" to upload to the folder EFTFiles on the FTP server
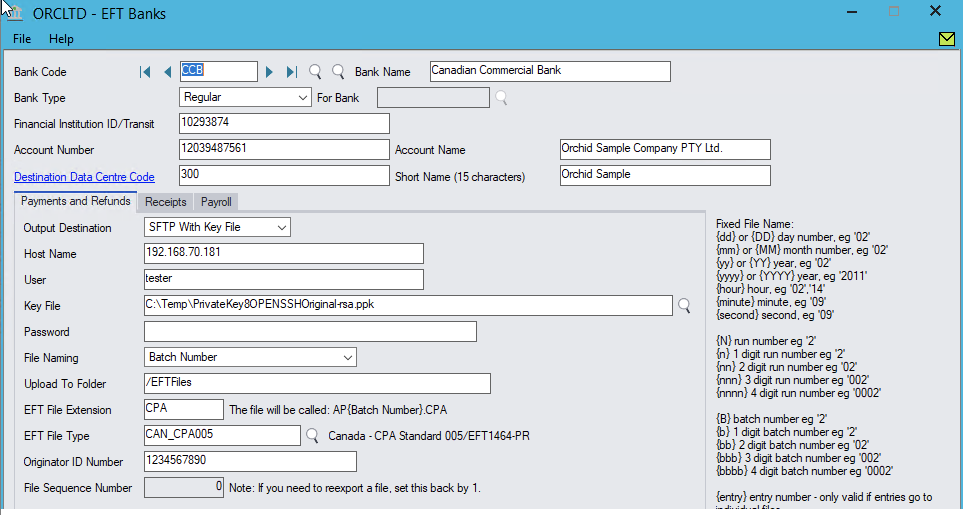
SFTP with Key File:
: SFTP With Key File
: IP Address or name of the FTP Server
: User Name
: Full path and name of the key file
: Enter the Password applied to the key file. This is recommended to protect the file, but is optional.
Important! You need to use the private key
This file needs to be in a shared directory on the server that all EFT Users who use Create EFT File must have access to. Restrict access to users who don't create EFT Files.
If the key file is on a network share, use UNC in the file path.
When using the EFT Processing web screens, the user configured in IIS to run the web screens needs to have access to the key file. You can copy the key file in the Sage 300 Shared Data folder, as access to the SharedData folder is required for the web screens to work.
Copy the full file path from File Explorer to the Key File field as there is no Browse files button on the web screens.
: "/" if you are uploading to the root directory, or "/xxx" if uploading to a folder on the FTP server.
Example: enter "/EFTFiles" to upload to the folder EFTFiles on the FTP server
SFTP 2FA with Key File and User Name / Password:
: "SFTP 2FA"
: IP Address or name of the FTP Server
: User Name
: Enter the user Password
Tip: To upload through EFT, do not use characters such as: ? = * in the password.
: Full path and name of the key file
Important! You need to use the private key
Note: This file needs to be in a shared directory on the server that all EFT Users who use Create EFT File must have access to. If it’s on a network share, use UNC in the file path.
: Enter the Password applied to the key file. This is recommended to protect the file, but is optional.
: "/" if you are uploading to the root directory, or "/xxx" if uploading to a folder on the FTP server.
Example: enter "/EFTFiles" to upload to the folder EFTFiles on the FTP server
Key file setup Tips
Note: This applies to both SFTP with Key File and SFTP 2FA
SSH keys are made up of two keys - a public key and a private key.
The file name for the public key is *.pub. You upload the public key to the FTP server (e.g. the bank's FTP site or your FTP Site).
You upload the private key to the FTP client (e.g. the Sage 300 Server)
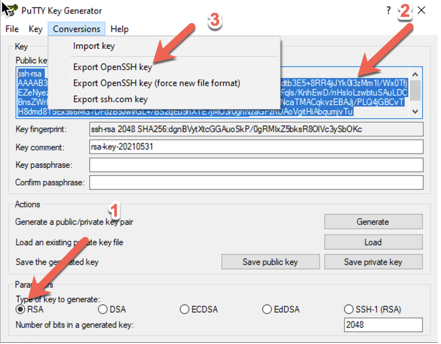
You need to use an OpenSSH key using the RSA format.
The Header & Footer row should look like this:
-----BEGIN RSA PRIVATE KEY-----
MIIEoQIBAAKCAQEAo962U1qVeERjyfoMIwam3h+17Ei9Ddetm8UysRNOHv3ZI3YF
....
AUx+RYObNhAZ7z54RqyOMO+YXIRob0b7JXv/XpusA+BBA1eE/w==
-----END RSA PRIVATE KEY-----
Using PuTTY Key Generator to generate the private key

Testing the FTP Configuration
You can use the Test SFTP File Upload button to test the EFT Bank configuration without having to create an EFT File.
-
If successful, EFT Processing displays a File uploaded message.
-
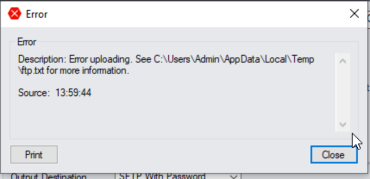
If unsuccessful, EFT Processing displays an error message and creates a log file in the user's temporary folder. The default path for the test file cannot be changed.
Review the log file and check the details you have entered.
Tip: One of the most common error when using SFTP with key file is to use the wrong key file or a key file in the wrong format. See Key file setup Tips

Tip: If unsuccessful, we recommend you install an FTP client, for example Filezilla, on the workstation where you will be running "Create EFT File". You can then use the FTP client to test the credentials you are using, and upload a test file to the required folder. If it works with an FTP client, but not with EFT Processing, contact your Sage 300 partner for support.


