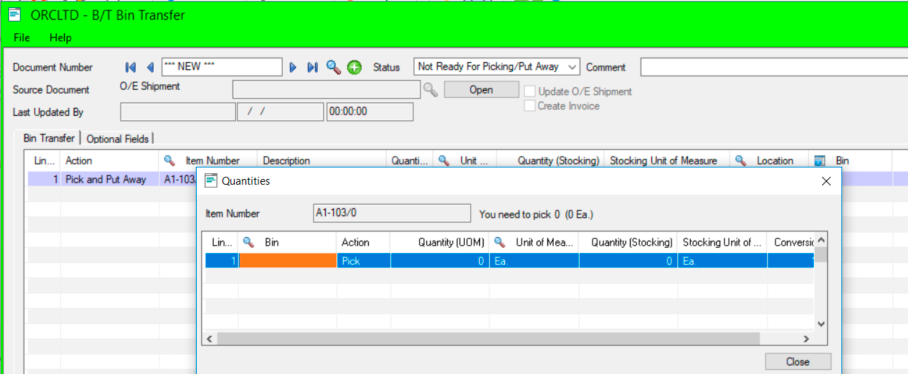
Bin Transfer - Field List
For details on how to use Bin Transfer, refer to Bin Transfer
Header:
Select the appropriate status for the bin transfer document
Enter an optional comment for the bin transfer document
Select the Sage 300 Source Document type for this bin transfer. If this transfer is not associated with a Sage 300 Source document, select None (for example for the take on bin quantities).
Allows you to open the associated source document
The user id, date and time this bin transfer document was last updated is displayed.
Select this option if you want Bin Tracking to invoice the OE Shipment when the associated Bin Transfer is completed.
Will only appear if OE Shipment is selected in the Source Document.
If this option is ticked then any changes to the quantities, serials/lots that are made (on the BT transfer screen) will be made on the OE Shipment screen. So if you change the Serial/Lot number on the Bin Transfer and tick the box, the quantity, Serial/Lot number on the OE Shipment will also be changed.
If you are using "Update O/E Shipment" on the B/T Bin Transfer Document to update amended serial numbers / lot numbers entered on the Bin Transfer Document back to the original source OE Shipment, you must set the O/E Option "Default Create Invoice Option" to "No" (O/E Setup -> O/E Options \ Processing tab)
If "Default Create Invoice Option" is set to "Yes", when the Bin Transfer document updates the OE Shipment, the OE Shipment will automatically be invoiced - irrespective of the selection made on the "Create Invoice" option on the Bin Transfer Document.
If the source document selected is PO Receipt you will have an option
to Update P/O Receipt.
Bin Transfer Line Tab:
Select the required action (Pick, Put away or Pick and Put Away)
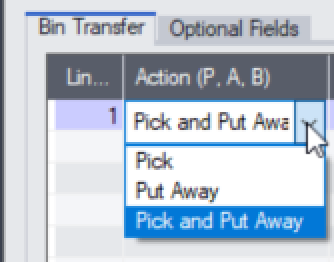
If you want to quickly select put away, without having to use the dropdown, you can press a keyboard shortcut instead.
P =Pick
A = Put Away
B = Both Pick and Put Away
Enter or select the required I/C Item
The I/C Item description is displayed
The stocking unit of measure for this item is displayed
For a Pick action, select or type the required pick location code
For a Pick action, select or type the required bin code from where the item will be/was picked (either the full bin code or the bin shortcut code)
Tip: If the item is being picked from multiple bins, click  on the "From Bin" column header and enter the bins and associated quantities on the list. The Bin Transfer detail line will now show "multiple bins' in the From Bin Column.
Enter the quantity picked (or to be picked)
The pick unit of measure is displayed
For a Put Away action, select or type the required put away location code
For a Put Away action, select or type the required bin code to where the item will be/was put away (either the full bin code or the bin shortcut code)
Enter the quantity put away (or to be put away)
If you have serial or lot numbers, then press F9 or click on in the "Put Away" column header while on the quantity field brings up a screen to enter the serial / lot numbers.
If the item is being put away in more than one bin, click on the Bin column header and complete the list of bins/quantities. The Bin Transfer details line will share "multiple bins' in the To Bin Column.
The put away unit of measure is displayed
The I/C Manufacturer's Item Number is displayed
Displays the status of the item line
If optional fields have been configured for the Bin Transfer detail, enter the optional field values.
If optional fields have been configured for the Bin Transfer header, enter the optional field values.
Select All to Pick/put away all rows
Bin Transfers - added 'Select All' button to the serial/lot window to pick/put away all rows.
You can also press space / delete on the quantity column on the main screen to pick all rows or set the quantity to 0.
Buttons and Controls
Click this button for the system to suggest picking bins for items which require picking. See Setup Options – Picking Method for a description on ranking bins for auto picking.
Click this button for the system to suggest put away bins for items which require putting away. Put away quantity will be amended if the quantity on the source document (e.g. PO Receipt) is amended.
See Bin Options - Field List for a description on ranking bins for auto put away.
Menu items
In the File menu, you can
-
Export the Bin Transfer document.
-
Set quantity to zero on all lines.
-
Refresh from Source Document.
Refresh from Source Document
In some exceptional instances, the lots on a Bin Transfer document are different to the lots on the source (OE Shipment or PO Receipt) which means the B/T document couldn’t be completed.
Refresh from Source Document can be used to fix the data if you know the source record is correct.
It shouldn’t normally be required since updating an OE Shipment or a PO Receipt should automatically update the Bin Transfer, but if a problem does occur then it will resync the documents.
![]()